The NZXT N7 Z370 Motherboard Review: A New Player in the Motherboard Market
by Joe Shields on January 9, 2018 12:00 PM EST- Posted in
- Motherboards
- Intel
- NZXT
- Coffee Lake
- i7-8700K
NZXT N7 Visual Inspection
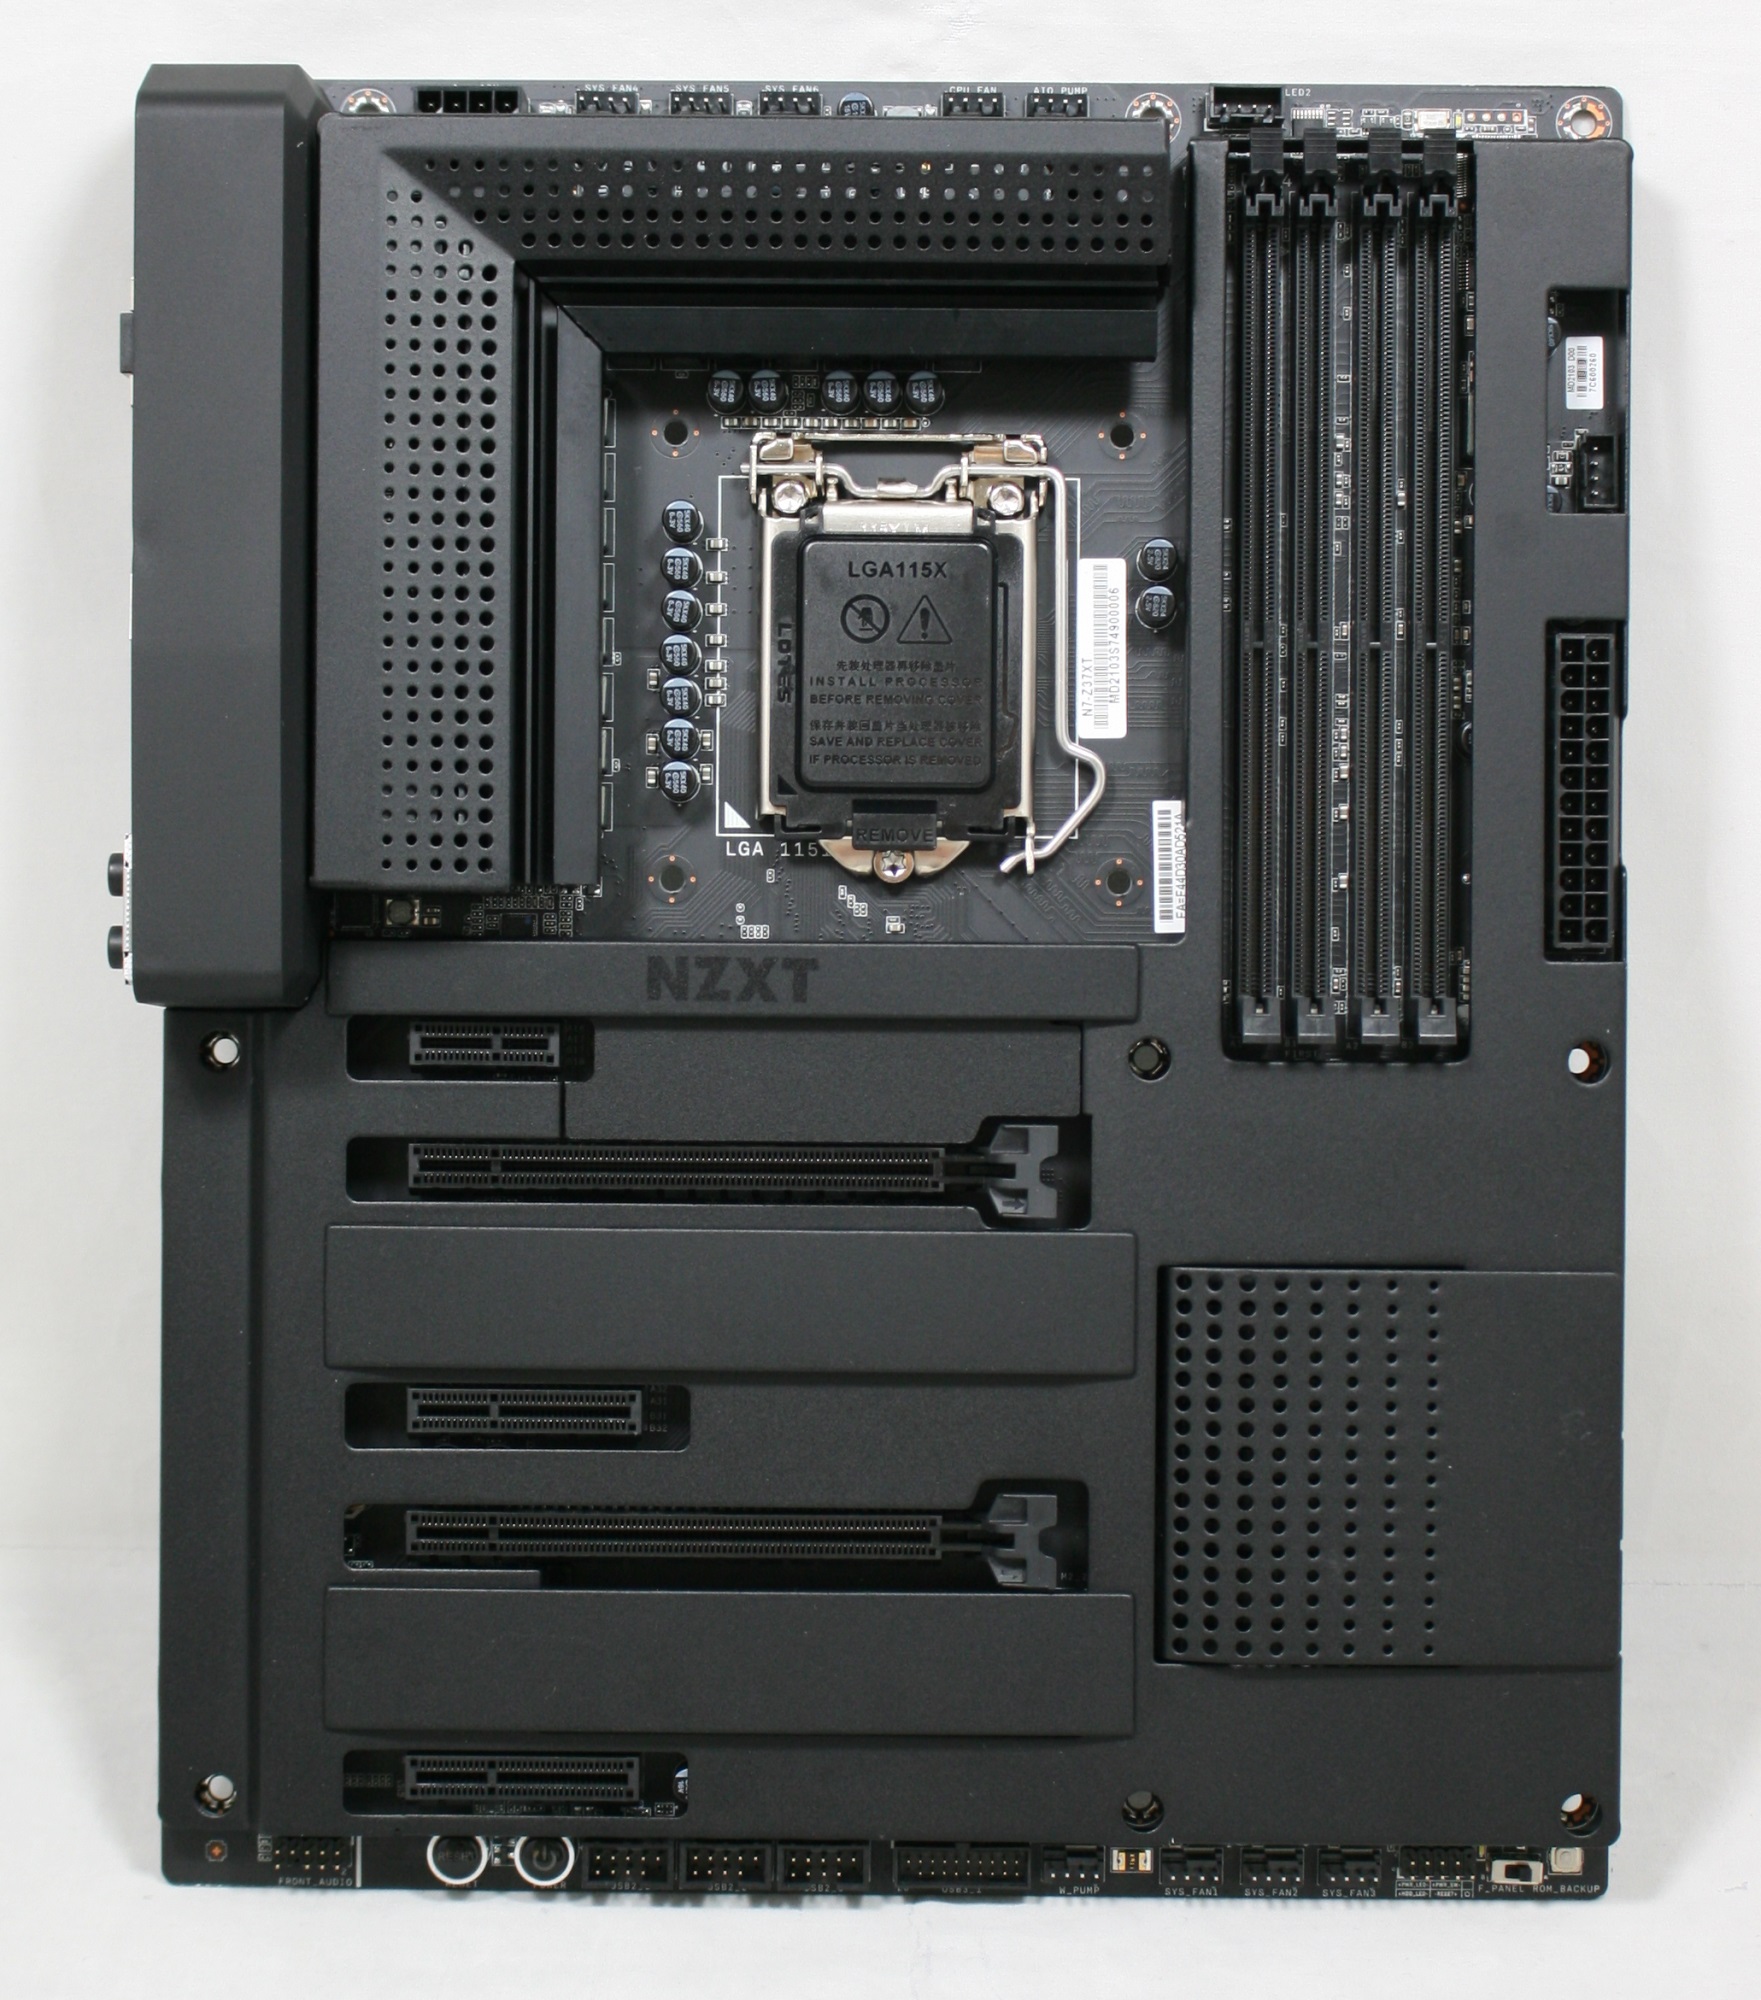
Our first glimpse of the board shows it is clad in what many will likely refer to as armor (thanks, ASUS!). The majority of the motherboard is covered in black aluminum shrouding. About the only exposed parts we are able to see are the important ones such as the socket, DRAM and PCIe slots, power connectors, as well as the headers on top and bottom. Between the PCIe slots are two covers that when removed, reveal the locations for the M.2 drives. If the stealth black look doesn't tickle your fancy, it is also available with the cover in white (picture in the gallery).
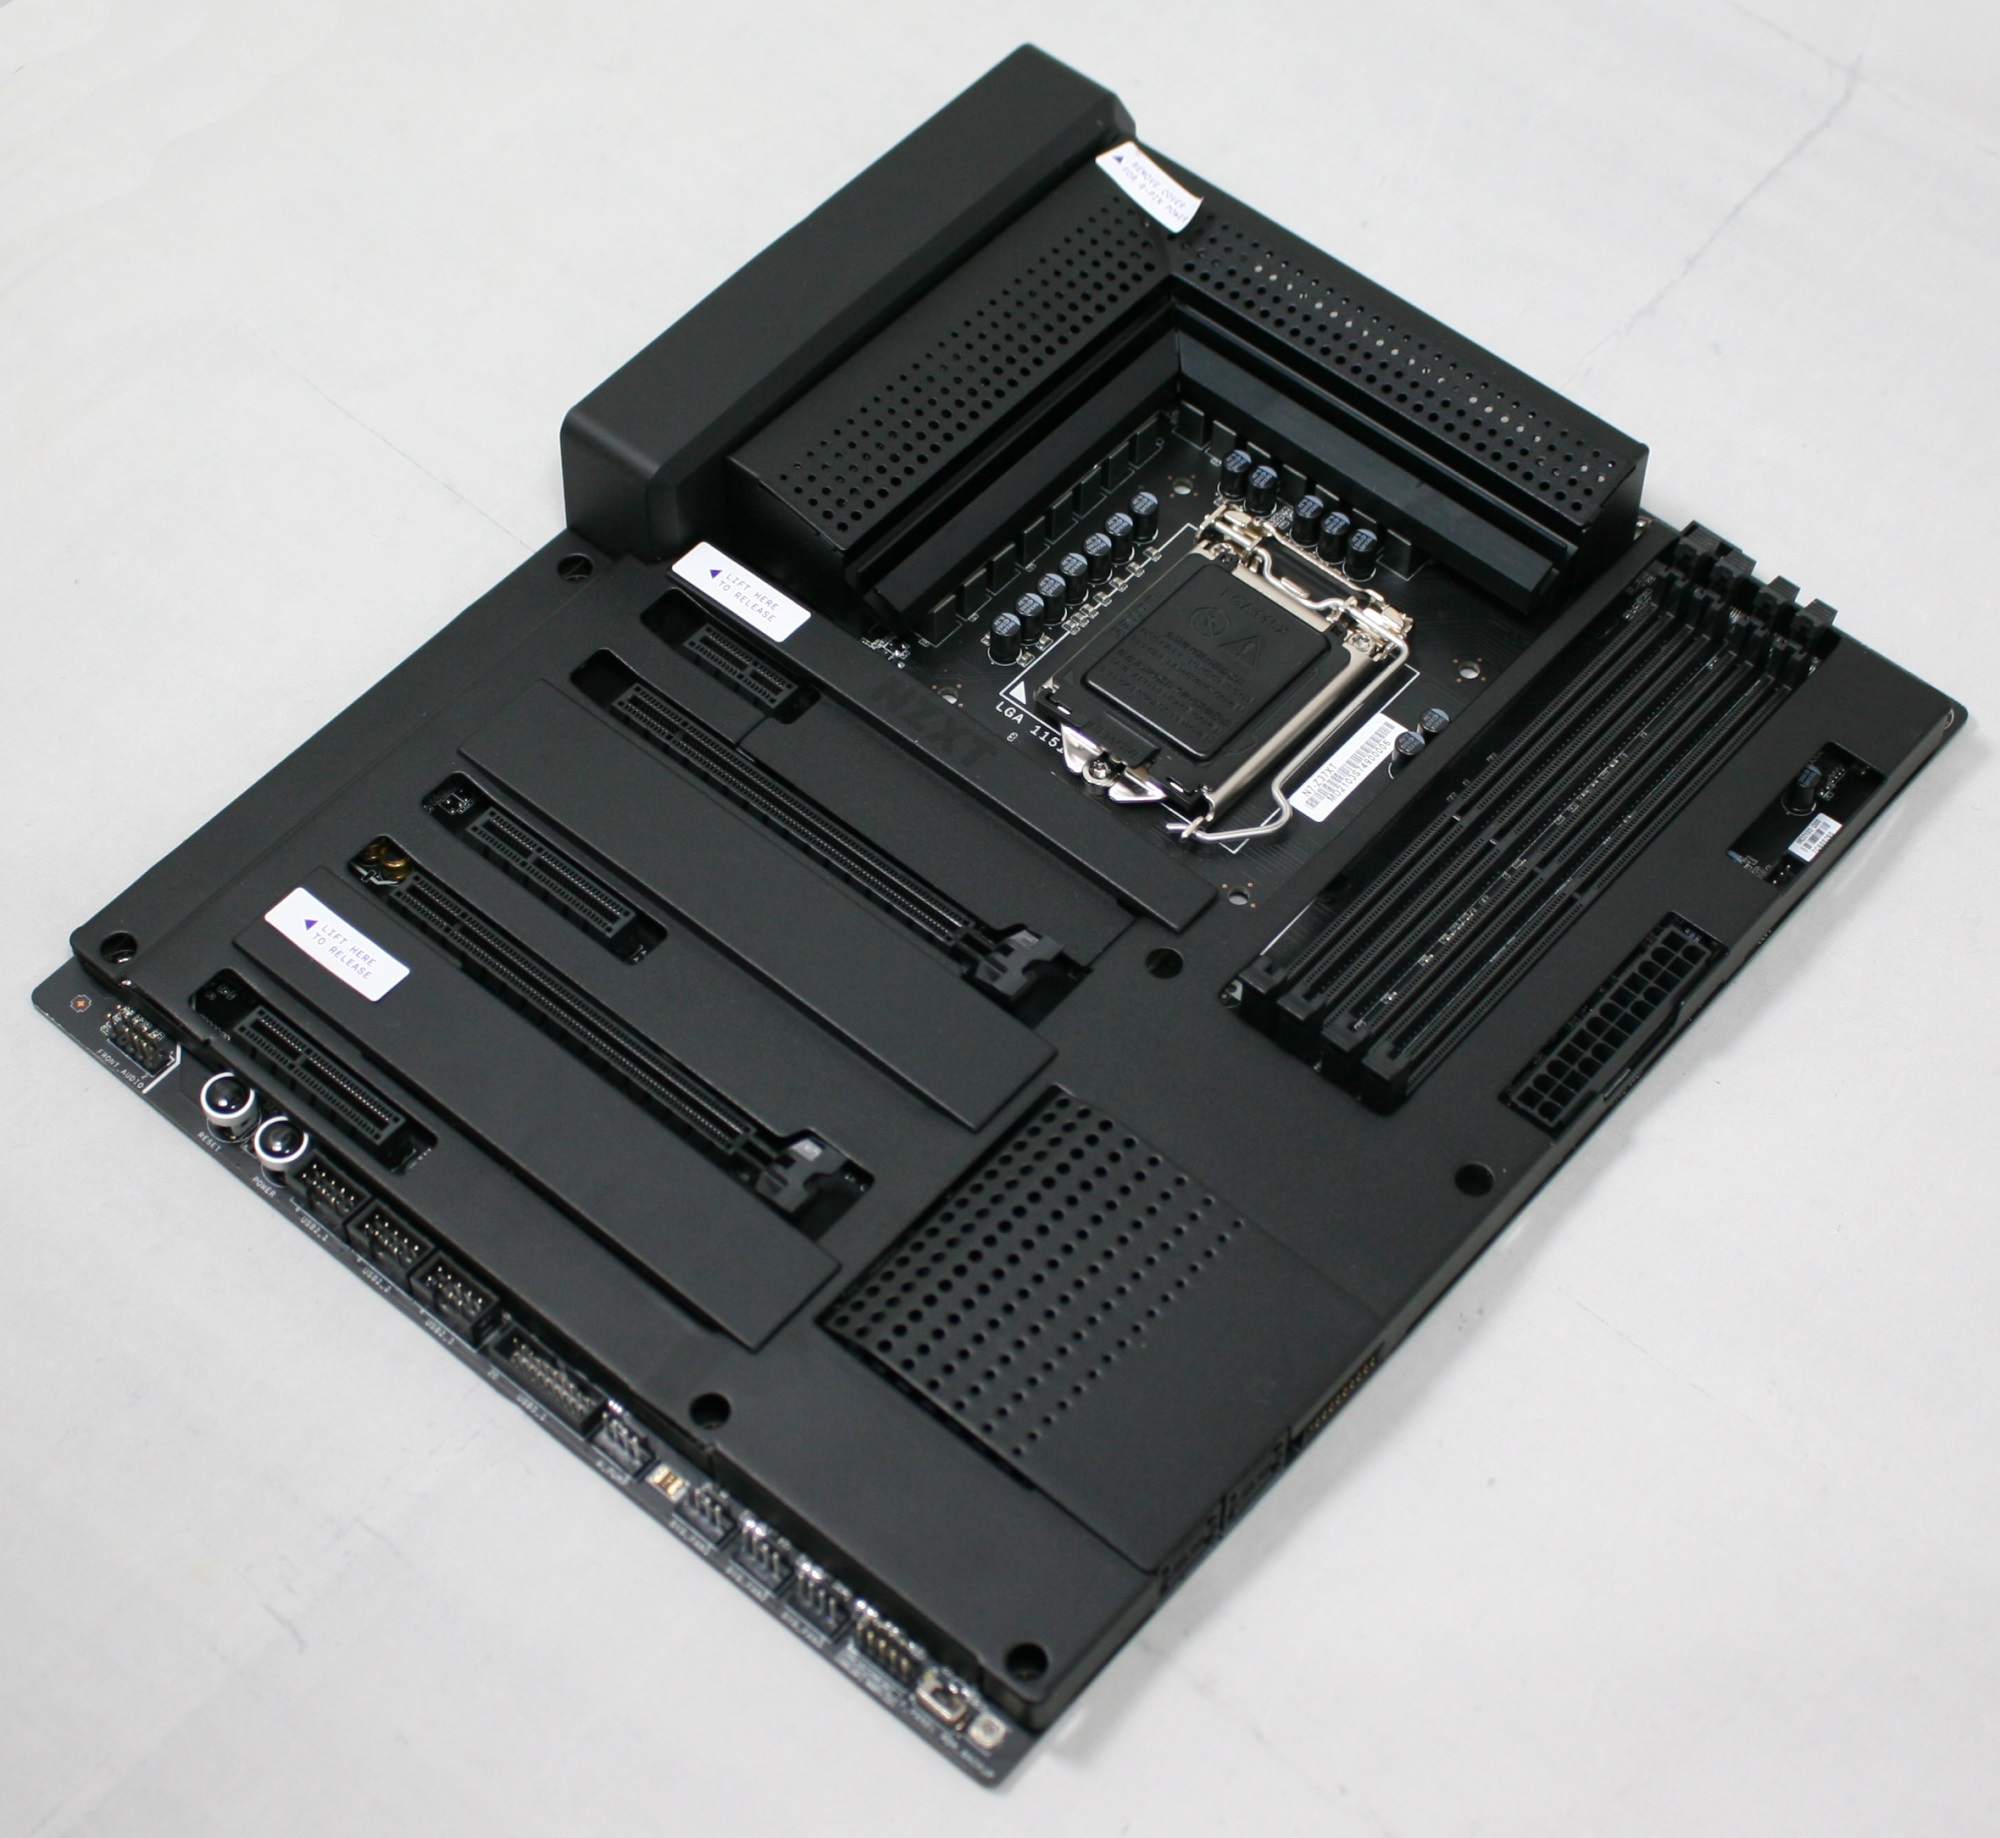
The perforated shroud on top of the chipset is attached via two ball and socket type connectors - when removed it exposes the actual chipset heatsink hidden below. The other perforated heatsink is mounted to the VRM heatsink partially hidden underneath. In order to remove this shroud, it takes four screws, two of which require removing the back panel IO shroud to reach. The large shroud itself is held on securely by metal pushpins. Removing it made me a bit nervous as I needed to use needle nose pliers to push the pins in and get it off. Since they are metal, after replacing the shroud, it wasn't as tight without using a tool to push them back out. Not many people like plastic push pins, but I can see a use case for them here (not that many will be removing the shroud anyway).
Overall, the board looks good with this shrouding and chooses not to use RGB LEDs. If those are a requirement, you will need to use the two onboard headers. For the M.2 drives, NZXT does recommend the shrouds are left off when in use.

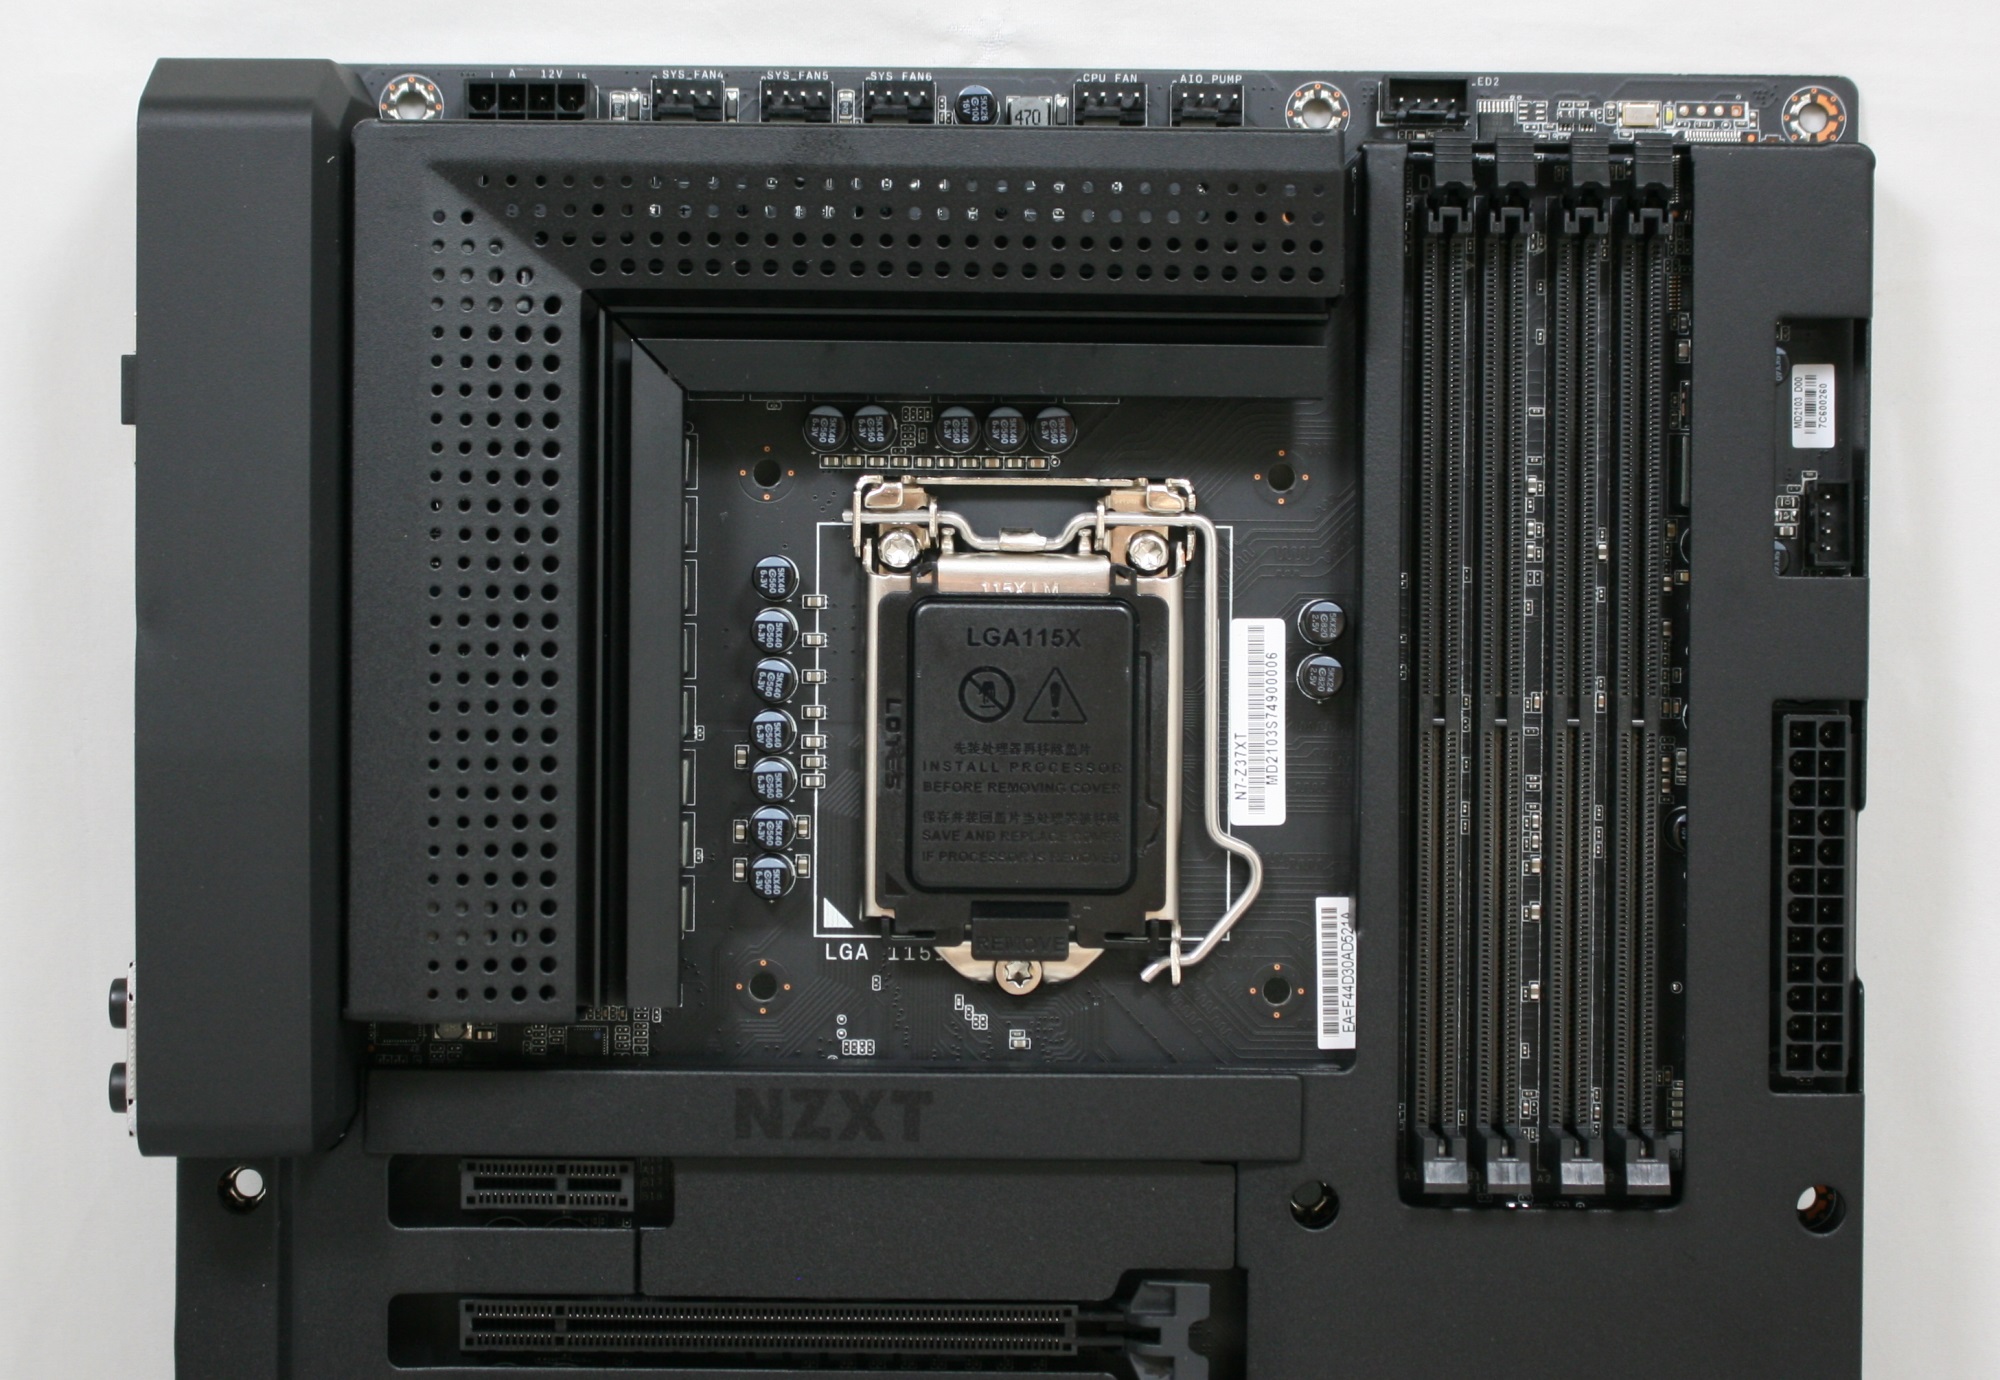
Starting off with fan headers, there are a total of nine fan/pump headers around the board. All of these are located either at the top of the board above the VRM or across the bottom part of the motherboard. The top headers are for the CPU fan, AIO Pump, and three system fans (Sys Fan 4/5/6). The bottom contains a W Pump fan and the first three system fans. All headers are able to control the attached device via PWM or DC methods through the BIOS or CAM software. The six system fan headers support up to 5W per channel so be aware if you have a powerful fan or want to daisy chain a couple on the header. Typically headers support around 1A. There was no mention of how much the CPU/AIO/W PUMP headers can handle.
The NZXT N7 VRM looks to be a total of 15 phases by count. These are controlled by a single Infineon IR35201 multi-phase buck controller for the CPU that we have seen on a few X299 boards we reviewed. The IR35201 is able to control a total of 8 phases which means these are doubled. The phase doublers used are IR3598 MOSFET drivers. Feeding power to the CPU is an 8-pin EPS 12V connector. This setup shouldn't have much issue driving the flagship i7-8700K.

As is typical with the Z370 platform, there are a total of four DRAM slots capable of supporting a total of 64GB RAM. Memory compatibility is up to DDR4 3866. What is visible in the picture is part of the 8-pin EPS 12V connector, five fan headers, and both of the RGB LED headers.
The right side of the board really doesn't havasdfasde much to show outside of the 24-pin ATX connector. An item of note, however... take a look at the hole in the shroud where we would screw in the motherboard. It is small - small enough in fact that the screws that come with my Banchetto 101 open-air benching station do not fit. These are not your typical screws, they have slightly larger heads than what one normally would receive with a case, but there is very little room for anything larger. This is the first time I ran across this issue with shrouds.

The Z370 chipset is able to split off six SATA ports with the NZXT N7 giving users four. This configuration ensures there is no SATA port sharing between the two M.2 drives. In other words, both M.2 slots can be populated and still have all four SATA ports available.

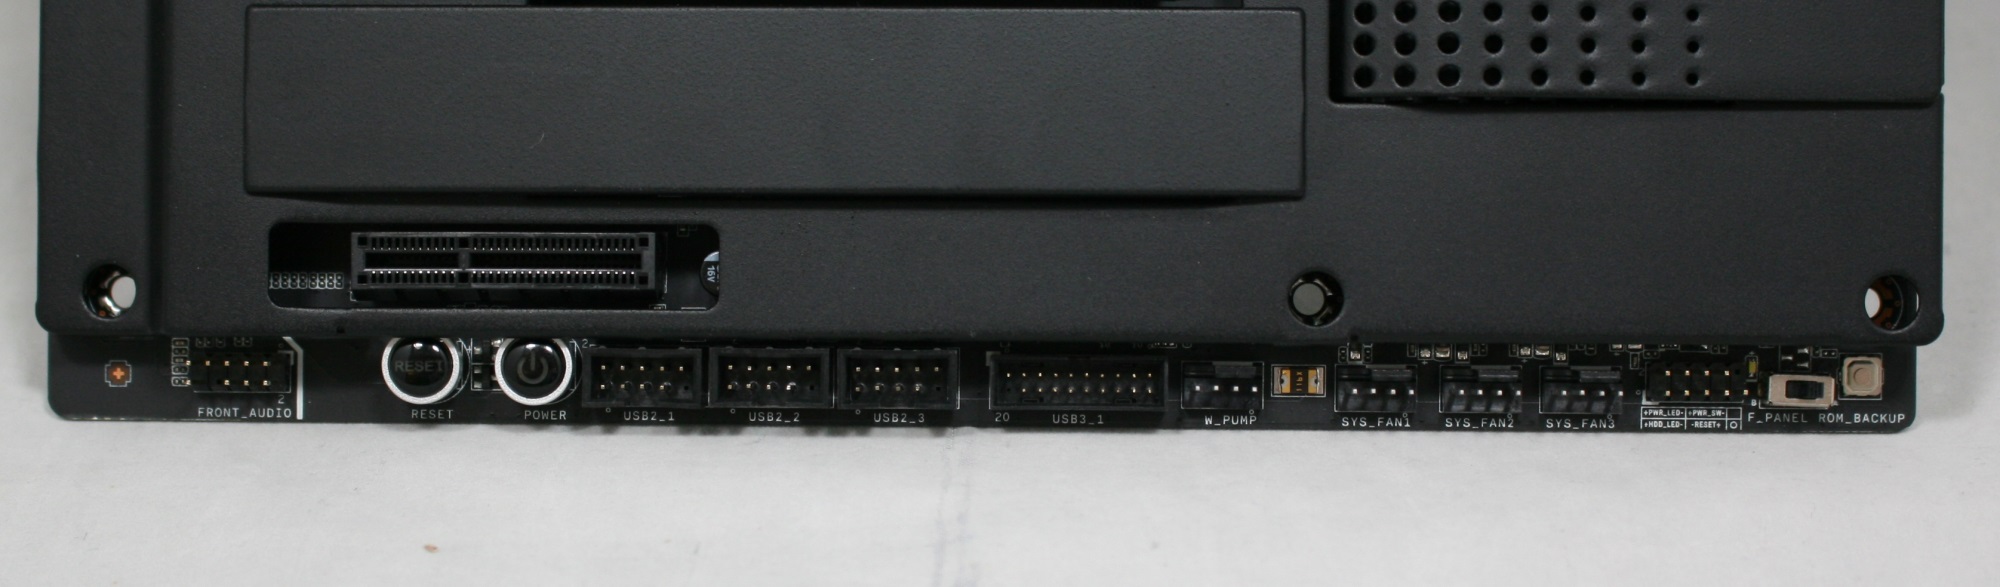
The bottom part of the board contains all sorts of headers. From left to right we see:
- Front Panel Audio
- Power/Reset Buttons
- 3 x USB 2.0 headers
- USB 3.0 header
- 4 x Fan headers (1 Pump, 3 fans)
- Front Panel connectors
- BIOS switch
- ROM Backup button
 The bottom half of the board comes equipped with a total of five PCIe slots. The two full-length slots are CPU connected while the x1 and x4 slots are connected via chipset. Also pictured here are the locations for the two M.2 drives with the covers removed. Both will fit up to 80mm modules. The bottom slot (M.2_2) supports both PCIe and SATA based drives while the top slots (M.2_1) supports only PCIe mode.
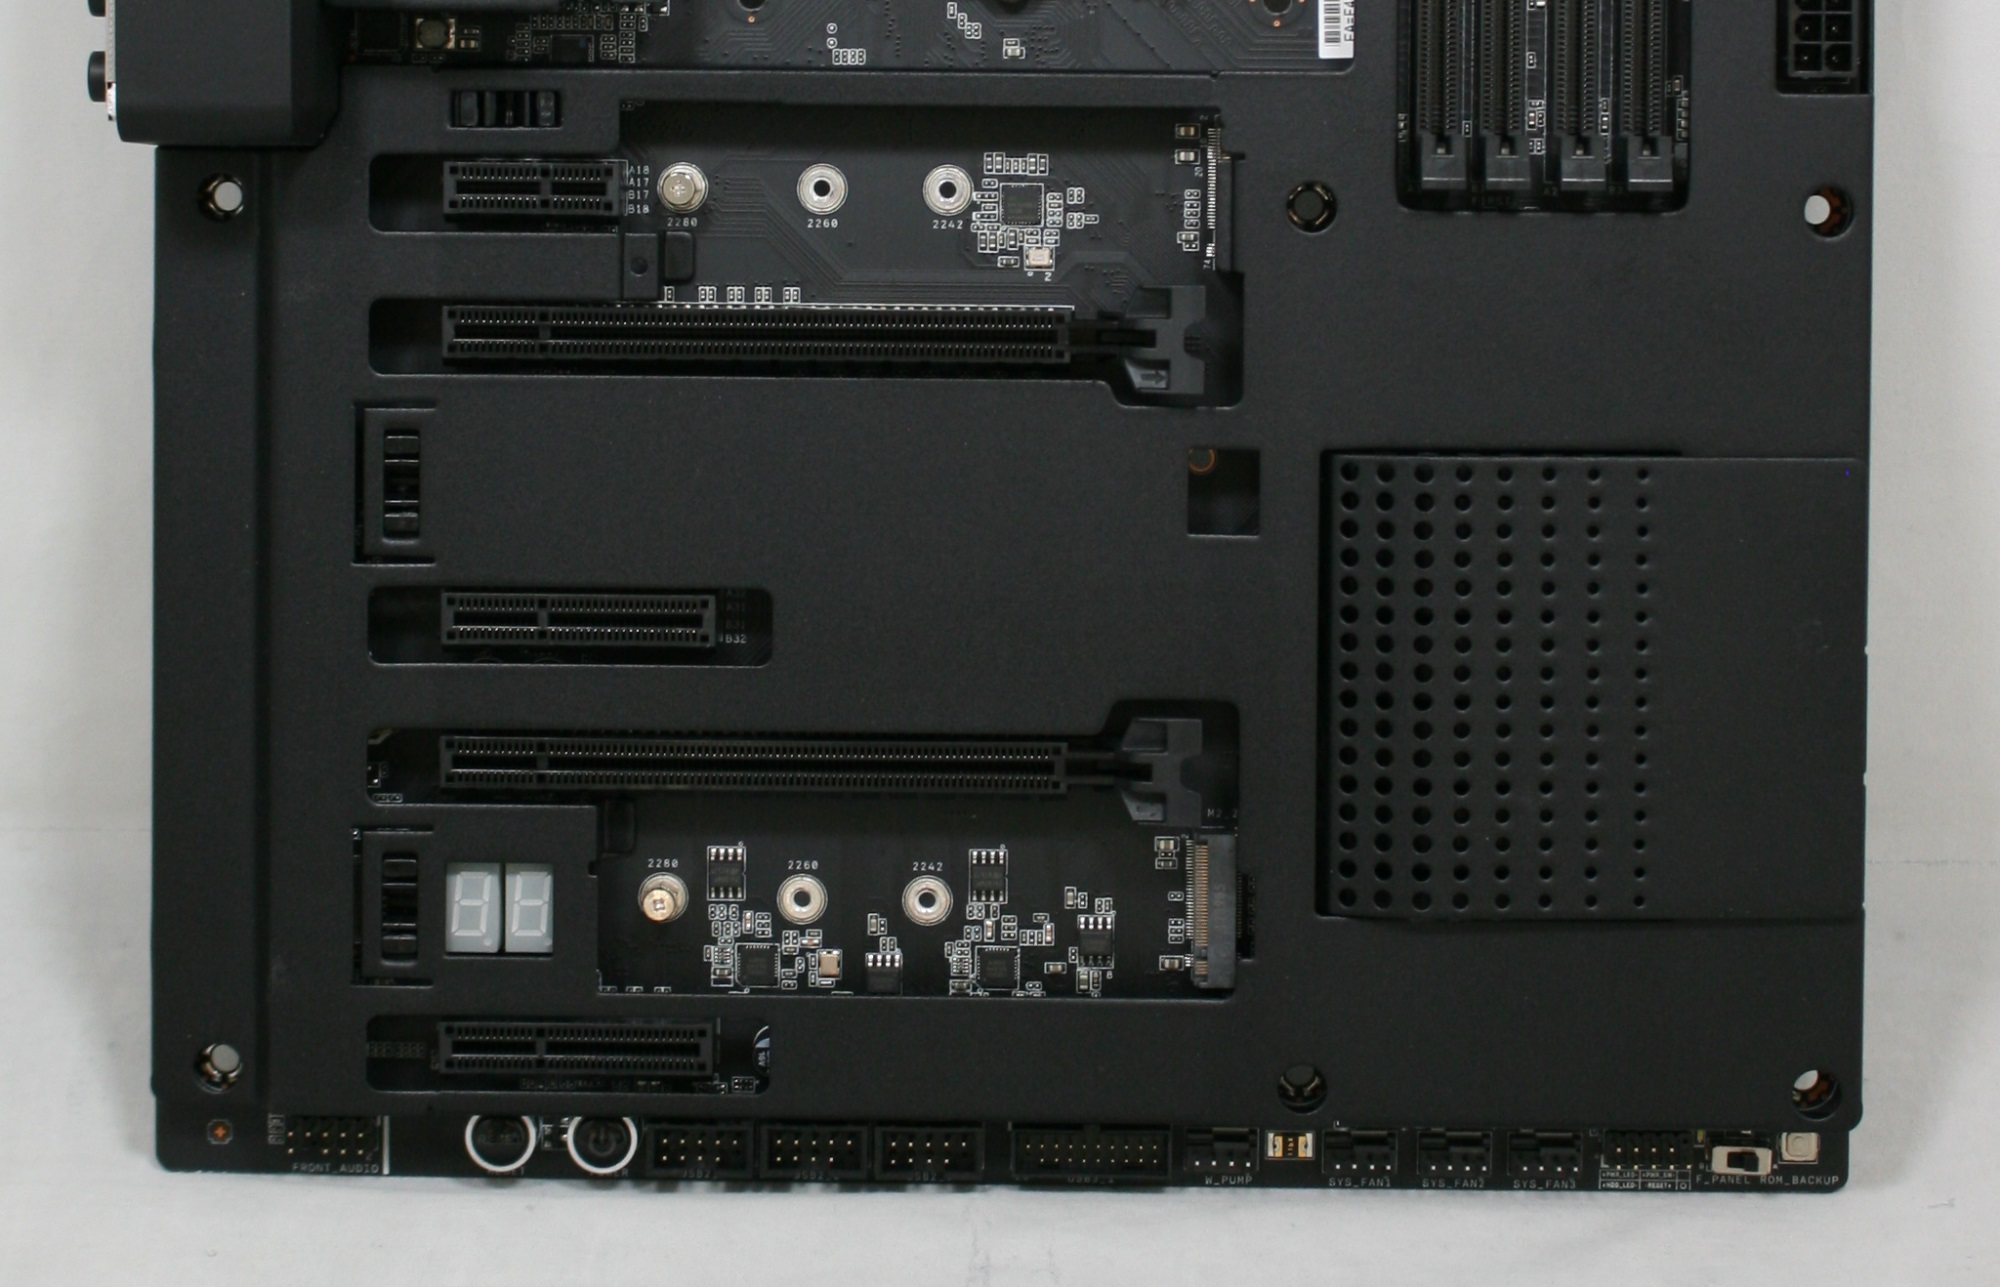
Below is a simplified list of how the PCIe slots will work with each family of CPUs (talking PCIe lanes) when multiple cards are used (the "@" symbol is used to show slot preference for the configuration). PCIe slot numbers are referred to by top-down. In other words, PCIe 1 is the first slot, PCIe 2 below it, and so on:
| NZXT N7 CPU PCIe Layout | ||
| 16-Lane Single |
16-Lane Dual |
|
| PCIe 1 | @x16 | x8 |
| PCIe 4 | - | x8 |
| SLI | - | Yes |
| Crossfire | - | Yes |
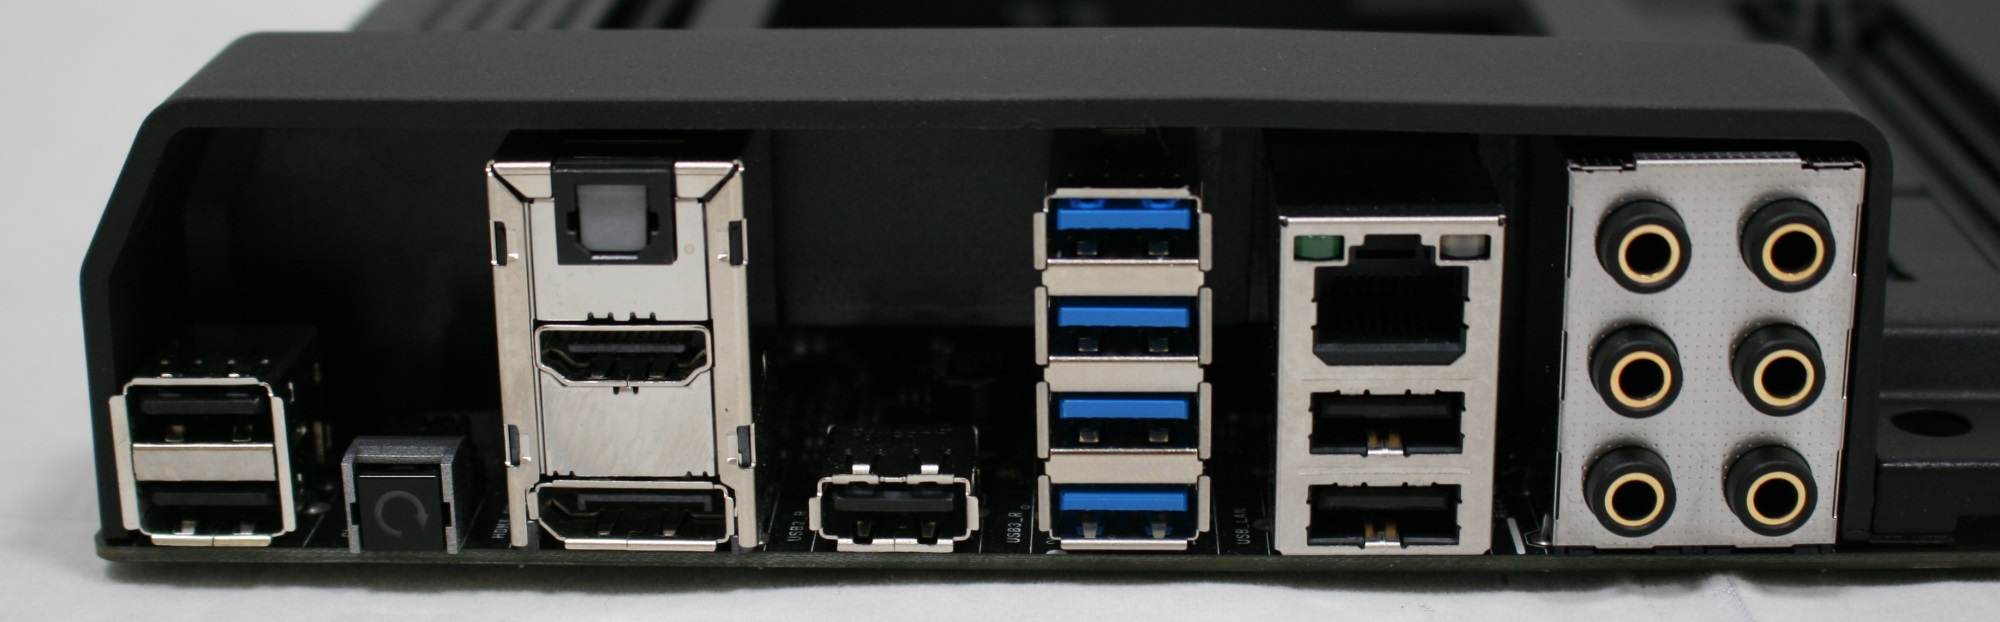
The back panel IO is devoid of many colors outside of the four USB 3.0 ports but has most of what we come to expect from a mid-range motherboard. What I do see missing are any USB 3.1 (10 Gbps) ports. Everything here is either 2.0 or 3.0. From left to right we have:
- 2 x USB 2.0 ports
- CMOS Reset button
- HDMI / DisplayPort / SPDIF outputs
- 1 x USB 2.0 port
- 4 x USB 3.0 ports
- Intel Gigabit LAN port
- 2 x USB 2.0 ports
- 7.1-Channel Audio jacks
In the Box
The accessory stack is pretty light but does include most anything needed to get started. A great value-add to the accessory stack are two RGB LED strips as well as two LED connection cables (500mm) and two extension cables (300mm). This list below is from the NZXT specifications:
- Users Manual
- I/O Shield
- 4 x SATA cables
- NZXT SLI Bridge
- 2 x LED strips
- 2 x 500mm LED connection cables
- 2 x 300mm LED extension cables
EDITOR'S NOTE: On 1/19/18 NZXT will not bundle the RGB LED strips or extensions in order to reduce the MSRP to $249


60 Comments
View All Comments
temptemp - Thursday, January 11, 2018 - link
WHY THE FUCK ARE YOU COMPARING DIFFERENT CPUs TO THE 8700K?!?!?!?!?Scientific method is you keep all except one variable constant.
This is a motherboard comparison.... wow
I throught this was a reputable site... wow lost my trust
Dug - Monday, January 15, 2018 - link
That was explained if you actually read the article. You obviously aren't a reputable or trusted reader.Kaihekoa - Saturday, January 13, 2018 - link
The usual Anandtech quality reviews, but the comparisons to i9 platform MBs are completely useless.justareader - Sunday, January 14, 2018 - link
The I/O ports should be color coordinated as well.thomasg - Monday, January 15, 2018 - link
I can appreciate the no-nonsense looks, and I'm sure there's a (probably very small) market for it.But what the market is really missing is an actual no-nonsense board.
I'd just love a simple and functional board with all the regular firmware options the high-end stuff has. No useless shrouds, no fancy lighting, no pointlessly oversized component coolers.
Just a solid board with an usable design for proper airflow (i. e. no 20 cc passive blocks oriented at 90 and 180 degrees at the same time).
For example something as Super Micro now does for Epyc workstations, just for the desktop platform: https://www.supermicro.nl/Aplus/motherboard/EPYC70...