MSI Big Bang-XPower II X79 Review – A World of Novelty Heatsinks
by Ian Cutress on February 25, 2012 3:00 PM EST- Posted in
- Motherboards
- MSI
- X79
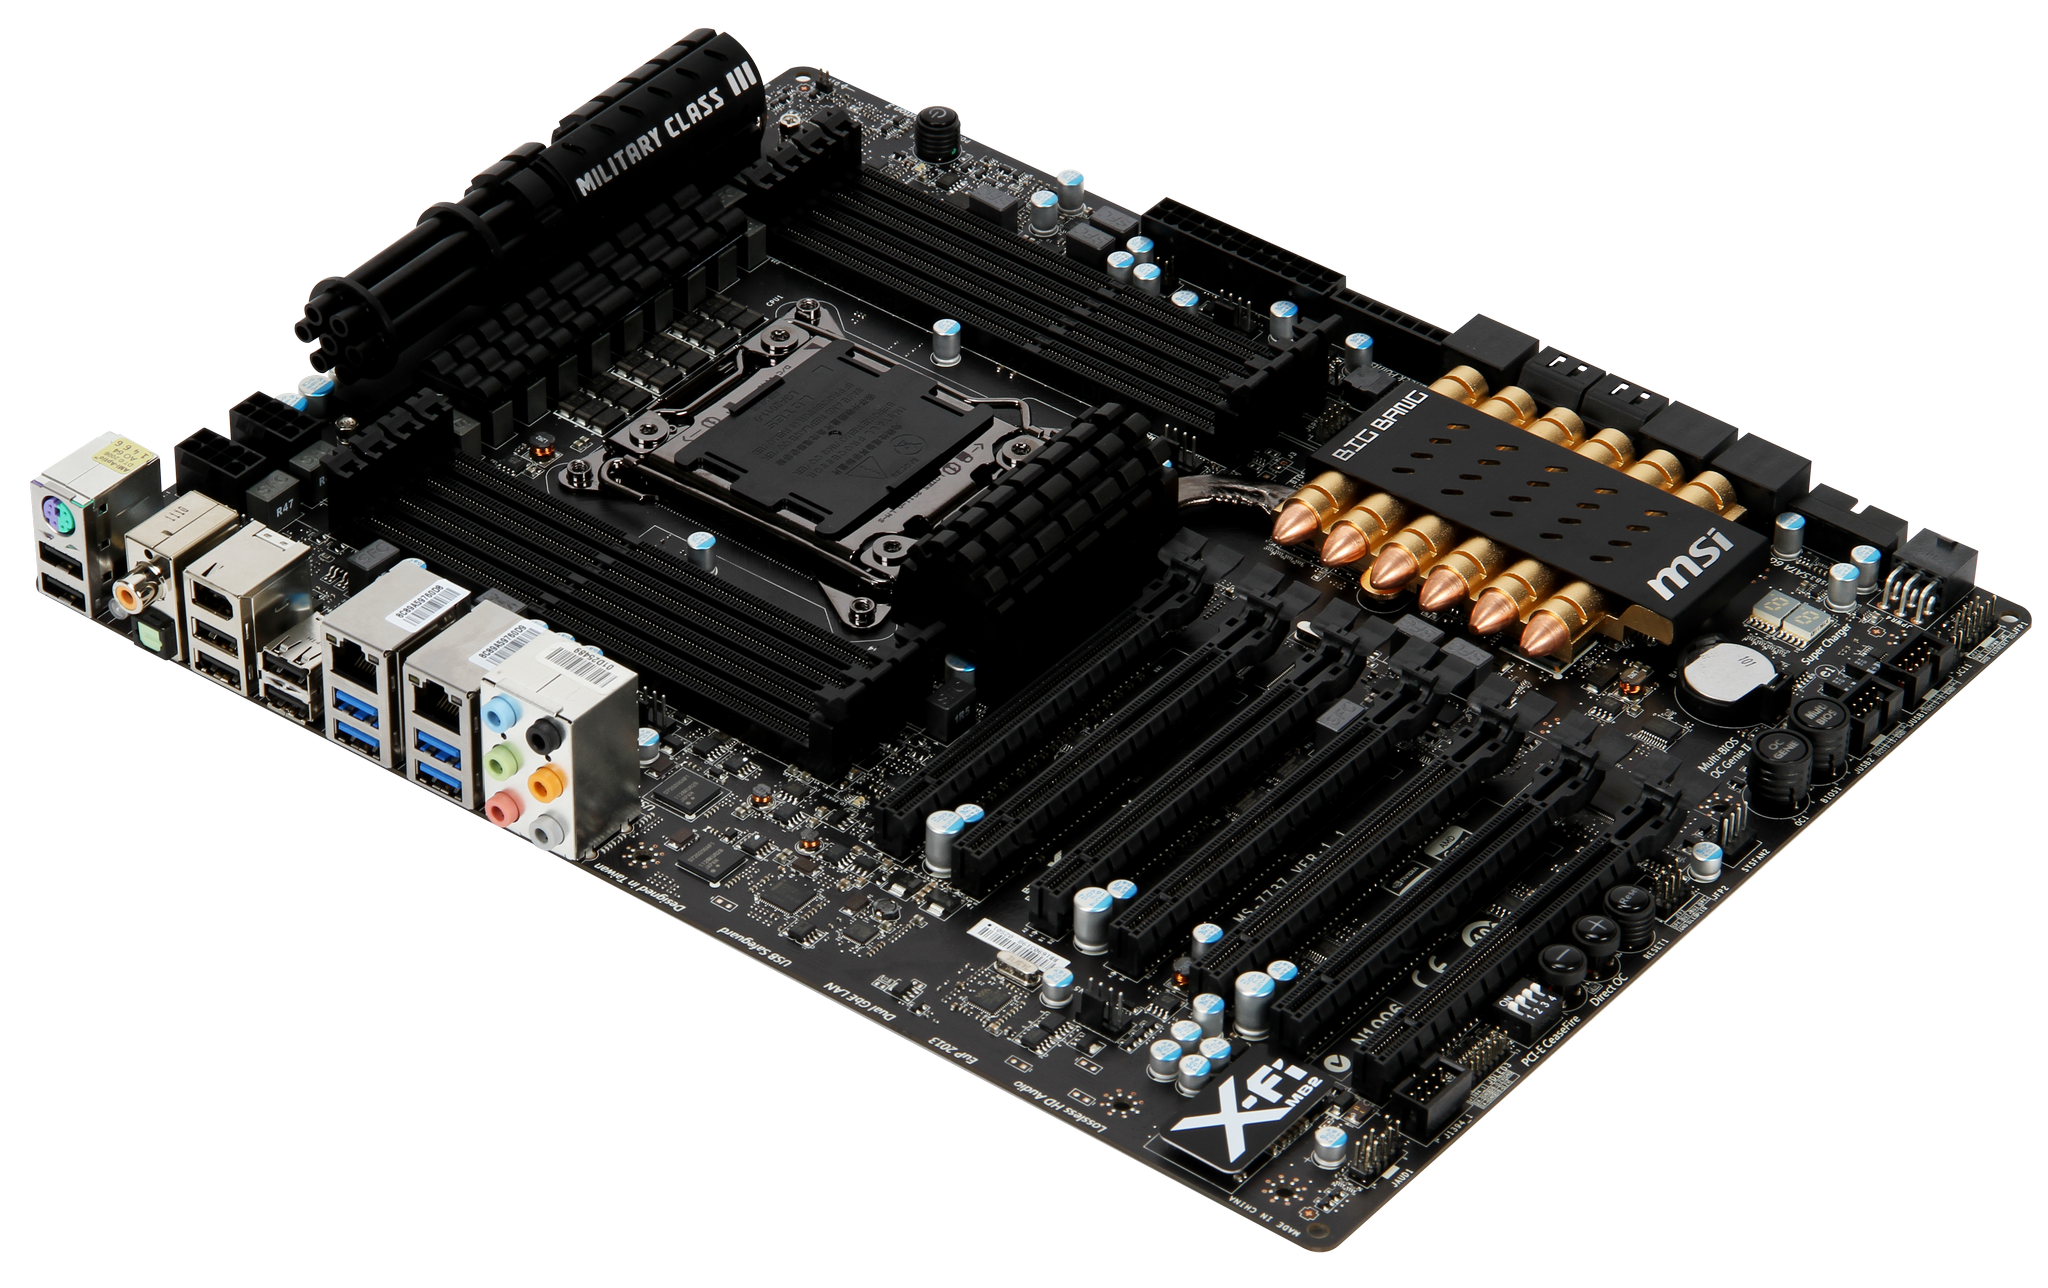
The cream of the MSI enthusiast range is the Big Bang series – in P55 we got the Trinergy and the Fuzion, for X58 we were treated to the XPower, in P67 there was the Marshal, and now with X79 MSI has graced us with the XPower II in the loosely defined XL-ATX form factor. Due to the increased size of the board (in length), the consumer is treated to seven PCIe slots, running at x16/x8/x8/x8 in full quad-GPU mode. This is also alongside some novelty heatsink design in the shape of a Gatling gun for the VRMs and rounds in an open magazine for the chipset. MSI even try and pull a sneaky one in the BIOS settings for better default performance depending on which BIOS you use.
Overview
The XL-ATX form factor in this instance gives the board another inch (~2.5 cm) in length to cater for the seven full length PCIe slots on board. This obviously means that it will struggle to fit in cases which strictly adhere to ATX specifications. There are also other benefits to a motherboard this size – MSI has added a large number of optional buttons for overclockers (voltage points, on-the-fly overclocking), and two extra SATA controllers for a total of six SATA 6 Gbps ports (10 SATA total). The USB 3.0 header is at right angles to the board in between the SATA ports, leading to a more efficient way of using the included USB 3.0 front panel in the box.
Out of the box, if you are lucky, MSI has been sneaky with their default BIOS options. Normally, as per Intel specifications, when an i7-3960X is used, the Turbo arranges the CPU speed at 3.9 GHz for single threaded loads, and 3.6 GHz for multi-threaded loads, and speeds in-between. On this MSI board, there is a BIOS option called ‘Turbo Enhance’, and when enabled, gives 3.9 GHz in all scenarios. Technically your CPU is not guaranteed to work at these speeds, and it should also void your warranty (as any overclock should), but it does give the user more performance if the board is just to plug in and go.
Network users will rejoice, with dual Intel network interfaces (82569V and 82574L) which should have added some cost to the board. This is in comparison to the audio, which is only the ALC898 – typically boards in this price range sport either this or a non-Realtek solution, meaning the MSI is only staying with the crowd on this one. The BIOS on offer is very simple to use and a big leap beyond MSI’s previous offering (you may recall my MSI P67 review, where the BIOS had games), with every option simply laid out and easy to find for both normal users and overclockers. I did have a slight issue with the BIOS, in that the first time I applied an XMP profile at 2400 MHz (16 GB kit) it worked fine, but the next day it would not load the OS on that BIOS at all (even at default settings).
In the box materials are abundant, and the board comes with a standard three-year warranty (even when using Military Class III parts and a Gatling gun as a heatsink). Overall, this board was fun to use and, despite the heatsink design, is good to look at. Due to the high-end nature of the product, I can see overclockers may want to take advantage of the 22 phase power delivery, and multi-GPU users enjoying x16/x8/x8/x8.
Visual Inspection
I could keep mentioning the military styling, attempting to draw parallels to Gigabyte’s Sniper and Assassin series – but these are essentially more for aesthetics than ultimate cooling ability. The gun as part of the VRM heatsink does increase surface area but probably hampers air flow, whereas the chipset heatsink feels as if it is made from plastic, perhaps why it is connected to another heatsink below the socket.
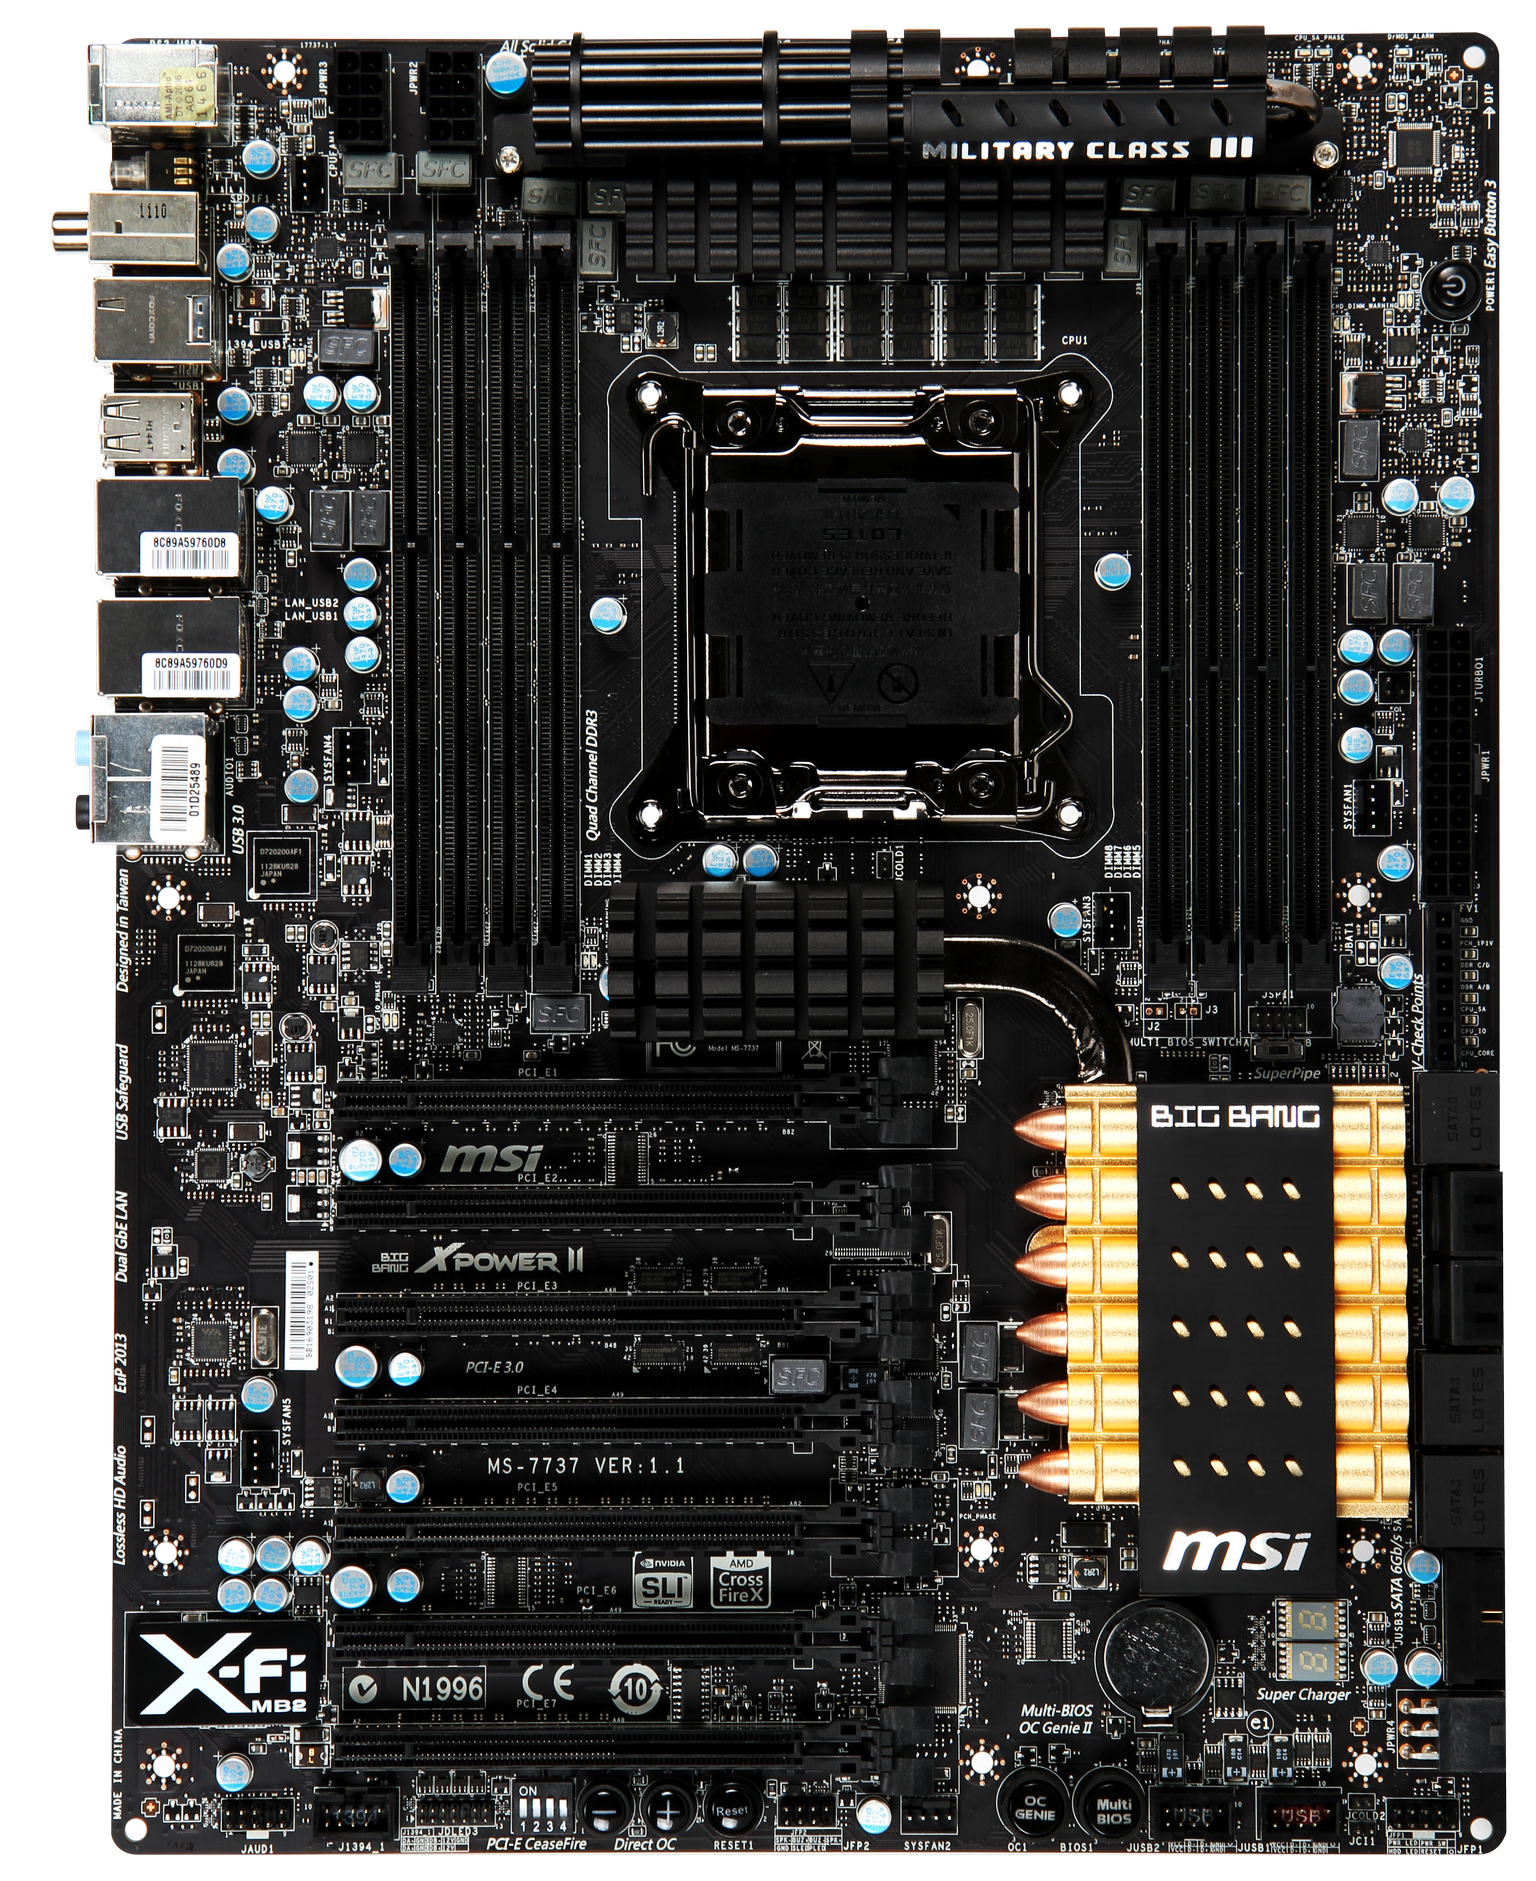
The top heatsink hides an extensive 22-phase CPU power delivery, which at peak (note, liquid nitrogen used by overclockers most likely) will require both the two eight-pin 12V connectors to the top left to be able to deliver over 600W to the CPU if needed. The DrMOS II are also hidden under here, which gives the board double temperature protection – a warning at 115ºC (LED on board and software in OS), and an automatic shutdown at 130ºC.
Due to the price point and size of this board, we have eight DIMM slots (two per channel) as we would expect, though the position of the heatsinks does limit orientations of large CPU air coolers somewhat. If only four sticks of memory are entered, they do not use the nearest DIMM slots to the CPU, giving a little extra horizontal room. We have six fan headers on board – one CPU 4-pin to the top left of the socket, one 4-pin SYS just inside the right bank of DIMMs towards the middle of the board, one by the 24-pin ATX power connector, one on the bottom of the board, one to the left of the PCIe (blocked by a third GPU), and one to the left of the DIMMs. These can be controlled by the BIOS and in the OS.
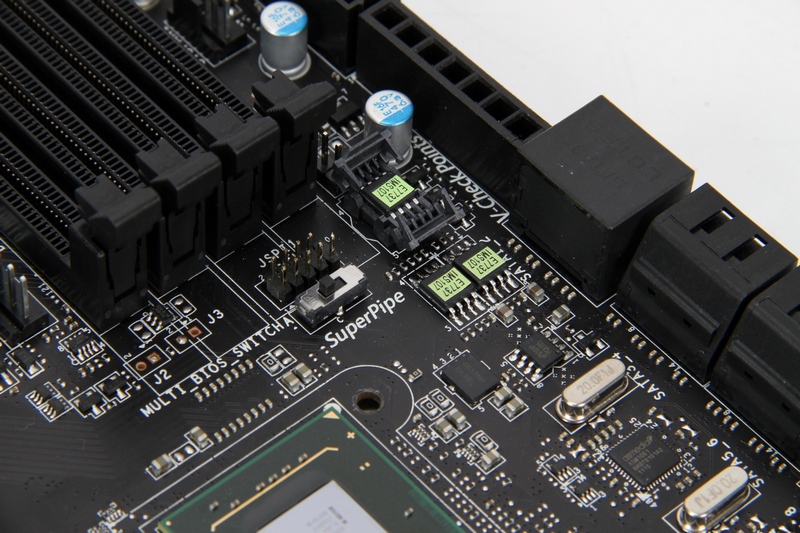
Unlike other boards, the on-board power and reset buttons are in completely different places. The power button is situated in the top right, whereas the reset button is located along the bottom next to the ‘DirectOC’. Typically we see these features together (I would assume to aid in the internal routing) in either one of those spaces. The reset button location caught me off-guard while overclocking a couple of times – more on that later. Beneath the power button along the right hand side, below the 24-pin ATX connector is a series of easy-to-use voltage read points for testers and extreme overclockers. This is always a handy feature on a top end board – if it were on anything cheaper, I wouldn't hesitate to suggest it adds un-necessary cost for 99.9% of users, but it is more than appropriate on the Big Bang-XPower II.
Just to the side of the voltage check points are a couple of features worthy of mention. MSI has equipped this board with an easy to replace BIOS system, allowing users who have distinct BIOS issues to replace the BIOS with no hassle. The Big Bang-XPower II already has a MultiBIOS system (that is, two BIOSes); however this system allows the user to replace one BIOS in case it goes absolutely wrong. Through my extreme overclock testing, I had several issues which caused the board not to boot fully, so I changed to the onboard second BIOS and re-wrote the first BIOS, rather than perhaps lose the second BIOS as well. (Writing over a dud BIOS is surprisingly easy, as long as you can still get into the other BIOS and can reach to push the MultiBIOS button on board.)
In terms of SATA ports, in order we are treated to two SATA 6 Gbps from the PCH, then four SATA 3 Gbps, also from the PCH. The next two sets of two are SATA 6 Gbps powered by ASMedia ASM1061 controllers. Unfortunately, only the first six are RAID capable via Intel’s Rapid Storage Technology. Beneath these SATA ports is the USB 3.0 header (NEC Controller) at right angles to the board, wholly suggesting that front panel USB 3.0 is the order of the day – either by removing the rear panel bracket from the 3.5” USB 3.0 panel included in the box or through any new case USB 3.0 connector. Beside this USB 3.0 header is a 6-pin power connector, identical to the ones found in GPUs. The purpose of this is two fold – more (stable) power to the PCIe ports when more than two GPUs are used, as well as an additional grounding device. Beside these connectors is a non-standard two-digit debug LED, useful for boot errors.
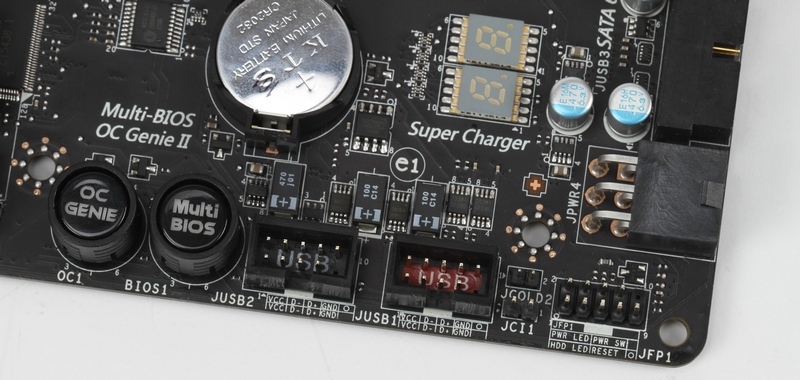
Along the bottom of the board, to start from right to left, we have the front panel header, two pin headers (one mentions JCOLD, so I assume it is a switch for sub-zero overclocking), two USB 2.0 headers (one of them designated the SuperCharger USB for quicker charging of USB devices), and a pair of interesting buttons – OC Genie and MultiBIOS. The OC Genie applies an MSI standard overclock to the CPU and memory (4.0 GHz and XMP, voltage bump) on boot and the MultiBIOS allows the user to switch between two BIOSes in case one is bad or if the user is an overclocker and has configured one or both BIOSes for specific benchmarks. Both of these buttons light up blue when depressed, just so you know they are definitely on.
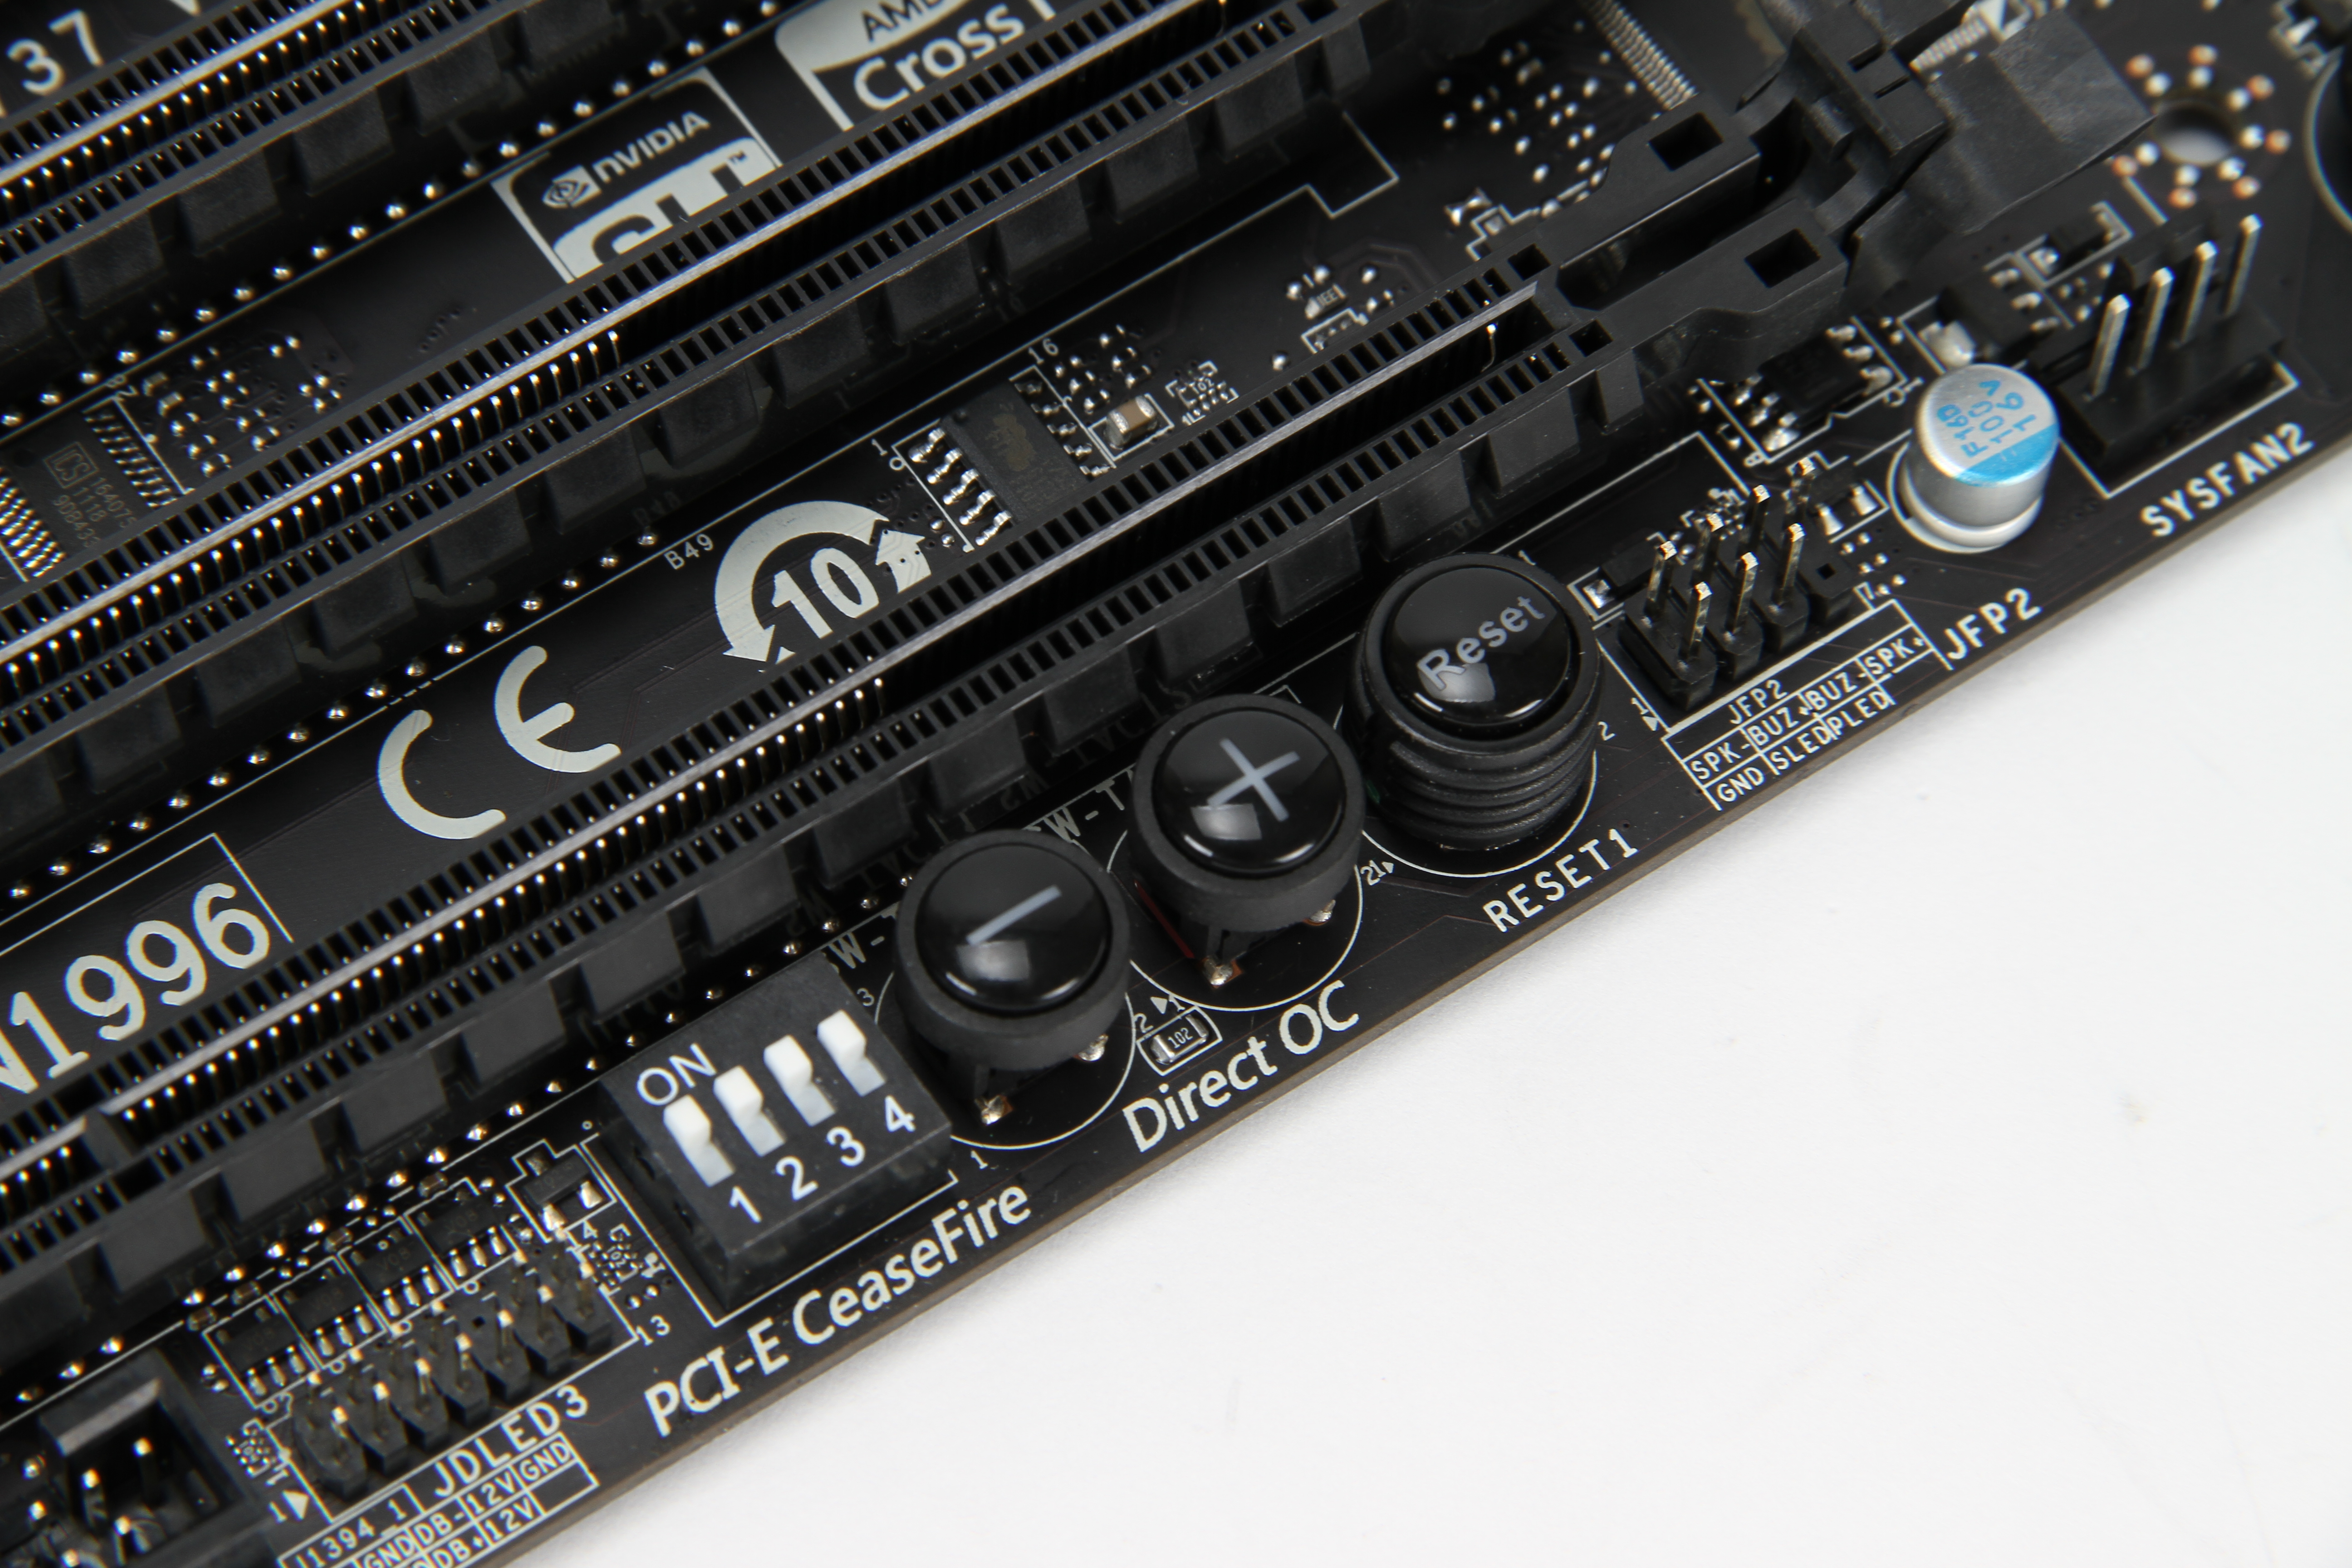
Continuing along the bottom of the board, we have a SYS fan header, another set of front panel pins (for buzzers and speakers), the onboard reset button, which is next to the two DirectOC buttons. The DirectOC buttons, when enabled in the BIOS, will adjust the base frequency of the CPU by ~0.1 MHz each press. However these are next to the reset button, which I did press accidentally on a couple of occasions, causing reboots. Next to the DirectOC is a series of DIP switches for controlling the PCIe slots (MSI has called this feature ‘PCIe Ceasefire’) – this is a feature we see on the high end overclocking boards, useful for determining PCIe problems or improving system stability, but most users need not worry about the feature. Along the bottom, we also have a Firewire header and front panel audio.
PCIe layout is easy to discuss – you get a lot of PCIe. Due to the extra length of this XL-ATX board over the standard ATX, there is room for seven PCIe slots. If they are populated with GPUs, the order becomes:
One GPU: x16/x1/-/x1/-/x1/-
Two GPUs: x16/x1/-/x1/x16/x1/-
Three GPUs: x16/x1/x8/x1/x8/x1/-
Four GPUs: x16/x1/x8/x1/x8/x1/x8
The four slots designated as GPU slots are PCIe Gen3 compatible, whereas the other three slots are PCIe Gen2 x1 slots. I assume that as the x1 are full length slots MSI has had feedback that suggests these are beneficial to those that use them. However, a board like this is unsuitable for GPU folders or simulators wanting to use more than four GPUs as the x1 limitation is quite severe (ideally, the x1 slots would have been multiplexed to x4/x4 with the x8 slots when occupied).
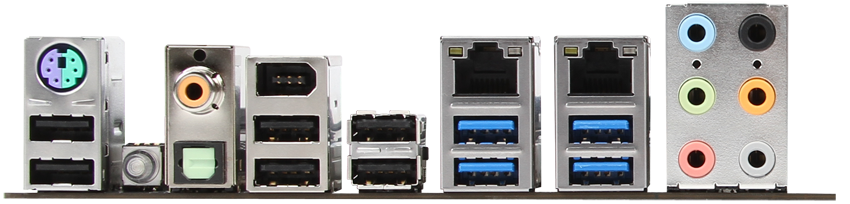
The IO back panel is pretty well organized – from left to right, we have a combination PS/2 port, two USB 2.0 ports, a clear CMOS button (which lights up blue), optical and digital S/PDIF outputs, a firewire header, four more USB 2.0 ports, dual Intel gigabit Ethernet, four USB 3.0 ports (blue), and standard audio jacks. For 99% of people, this covers almost all functionality. Areas for improvement (which perhaps other boards may include) are a wifi connector or a Bluetooth dongle – both of which may provide instability for overclockers but would increase the overall functionality of the board.


45 Comments
View All Comments
Operandi - Sunday, February 26, 2012 - link
"Giant fag" might be going a bit far but unless MSI is aiming for the immature 14 year old who lives their life through MW or BF I think they missed the mark big time with the design. Which is too bad because I otherwise I like the murdered out all black aesthetic.As it is Asus, Gigabyte are both making great boards that don't look stupid so I can easily skip this and look elsewhere.
leignheart - Wednesday, May 16, 2012 - link
nah it would only scream that if you owned it Ben90bobeedee - Sunday, February 26, 2012 - link
got to agree with physical-leave the stupid toys off of the motherboard.Bownce - Tuesday, February 28, 2012 - link
I think they're great. They should also include bandoleers for overclocking, a tiny lever action for resetting, and a D.B. icon for when it crashes.Oxford Guy - Saturday, February 25, 2012 - link
Isn't that exciting! Wow!Guys! Maybe think about cooling it with the exclamation point! Most of the review blurbs on the main page have them!
Oxford Guy - Saturday, February 25, 2012 - link
Probably the best PSU ever! Like O-My-Gosh!http://www.anandtech.com/show/5464/seasonic-platin...
coolhardware - Saturday, February 25, 2012 - link
I like all the exclamation points!PS Thanks for all the reviews and content lately, it is nice to see AnandTech updated so often...
Iketh - Saturday, February 25, 2012 - link
This particle article I didn't care to read in its entirety, so I glanced through hoping to find the few pieces of information I wanted. One was the MSRP... it's always listed at the bottom of the spec list in every other review on this site. Why omit it here? Please adhere to some of these simple standards so that your articles are less taxing on the reader.IanCutress - Saturday, February 25, 2012 - link
There are no official standards in motherboard reviewing, so unless you provide a list of official 'simple standards' then there is nothing to do apart from consider your request/command to have it exactly where you specifically want information XYZ. The MSRP is listed in a number of places throughout the review (and is consistent with previous reviews) - a link through on the product to a retailer on the test bed, and the last page in particular. It wouldn't be a proper review if we didn't talk about the price! For the record, it is currently $390.All the best,
Ian
Iketh - Saturday, February 25, 2012 - link
Sure there is. The articles on this site follow a similar pattern regardless of what they're about. After not finding the price in the introduction, I knew to jump to the page that introduces the board to find the spec sheet. Unfortunately, the price was not listed at the bottom as it normally is.Of course you talked about the price, I just didn't want to read the full article to find it as I alluded to in my first post. It's a request based on what I'm used to at this site, not a command.
And by the way, there are very few articles I rarely read from beginning to end here. It's just the theme of this board is childish, like a cheap toy when it's anything but.