The ASUS X99 Rampage V Extreme ROG Review
by Ian Cutress on June 22, 2015 8:45 AM EST- Posted in
- Motherboards
- Asus
- ROG
- Haswell-E
- X99
ASUS Rampage V Extreme BIOS
There are a couple of interesting statistics that I want to see but I bet I’ll never be able to get a representative sample. These questions include, but are not limited to:
- How many users ever use the BIOS?
- How many users overclock? Using the BIOS, Software or other?
- What percentage of users ever update the BIOS?
- To those that do not use the BIOS, what stops you?
Actually, that last question might come with an answer, perhaps relating to fear, lack of experience or lack of interest. The same thing goes with the bundled software, incidentally enough. But the simple matter of this comes down to the fact that these motherboards are designed to plug and play, without any user needing to configure options. Bundle in a CPU, some DRAM, a graphics card, storage and an operating system and you’re pretty much set – at least that’s the theory.
Motherboard manufacturers update the BIOS as new hardware comes out to improve compatibility, fix bugs or introduce new features. Some of these are under-the-hood, others have a more active role, especially when compatibility is concerned. This often requires a user to go through the BIOS to update it, or using the manufacturer software. A decade ago, the issue was always that firmware updates could brick the motherboard if they fail in the middle, and I would envisage that an element of that still exists in the zeitgeist. Over the past decade, we now get dual BIOS chips on most reasonable motherboards in case this happens, but the process is still a little cumbersome on all but a few implementations. Is there a way to fix this?
The reason I bring this up is partly the reason I like to go through a manufacturer’s BIOS. (Personally I always refer to it as a BIOS, rather than a UEFI/EFI, as to avoid confusion.) As part of the firmware we essentially have the essence of the motherboard, and it holds a number of key enhancements or marketable features that the manufacturers like to promote. It can also be the source of many woes, which I have found to my detriment in the past, or wholly influence the performance of a product from BIOS to BIOS, making testing and reviewing a little difficult without a rigid procedure in place. Despite the fact that (I believe) few users ever update the BIOS, before we test we do typically update it to the latest public release. Unless there are serious problems, I refuse to use emailed BIOSes, merely to avoid the opportunity of a ‘media enhanced’ firmware. I want to use what our readers end up with after all.
As a motherboard manufacturer, ASUS like the others does like to promote its BIOS features. Every year, for good reason, several tech media outlets are introduced by the ASUS technical marketing and engineers through the latest updates, how to use them, and why they have implemented them. The goal here is for writers like myself to accurately portray the features at hand, rather than stumble across something at review time and write it off due to lack of knowledge. Of course, some features make sense and are actually pretty good, and others might need another design cycle, but most of the motherboard manufacturers are at least reactive to our thoughts here at AnandTech, including those of our readers. Fundamental changes to the BIOS take time, sometimes in the order of quarters, but other tweaks can occur in weeks or days, depending on what they are. I’m happy to say that ASUS and others have at least implemented a few of our thoughts, or at least the essence of them, over the years.
One of the benefits of the BIOS, being what it is means that some features are platform agnostic and easier to transfer over. As a result, for example on the ASUS boards, we see a consistent EZ Mode/Advanced Mode design, with features like QFan controls being pervasive across most of the range:
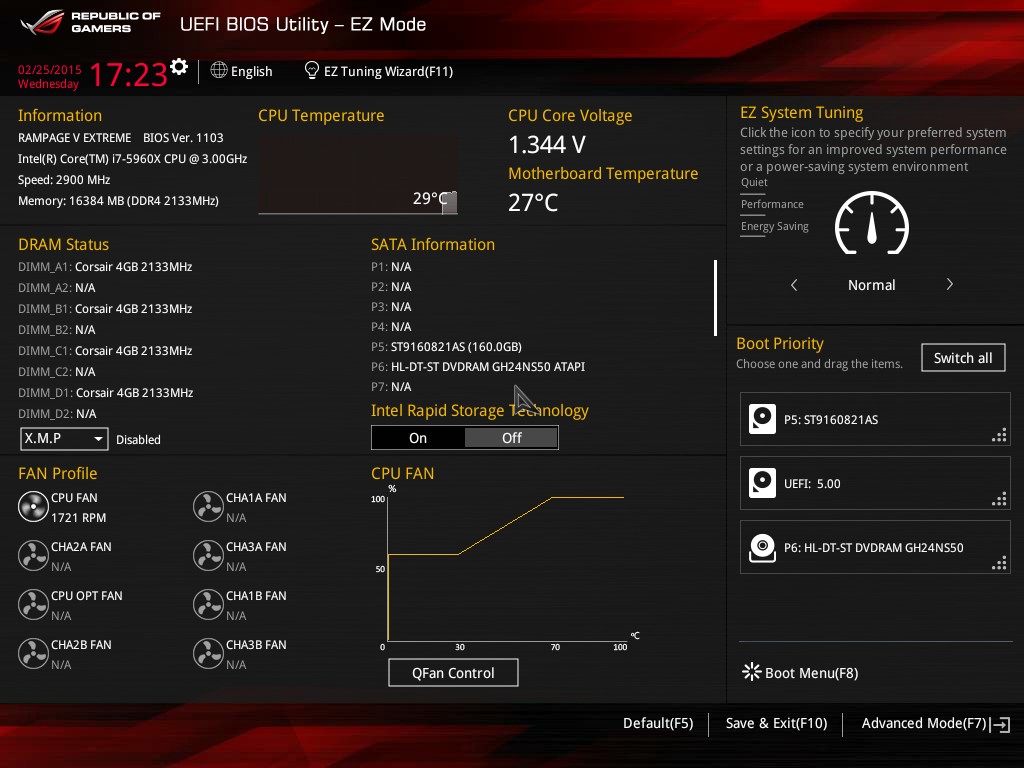
This front screen is the EZ Mode of ASUS’ BIOS, implemented to give somewhat of a ‘system-at-a-glance’ for users. We get the board name, BIOS version, CPU installed, CPU frequency, CPU temperature, CPU voltage, DRAM installed on a per module basis, SATA information, boot order, fan speeds, a boot menu and the fan profile for the CPU fan. I have remarked on the level of detail I like to see when entering the BIOS, and what ASUS provides upon entry is essentially what I need if I am examining a system for the first time without opening the case. From this screen users can also enable XMP on the left hand side, adjust the boot order by drag and drop, perform quick tuning or move into the graphical fan controls.
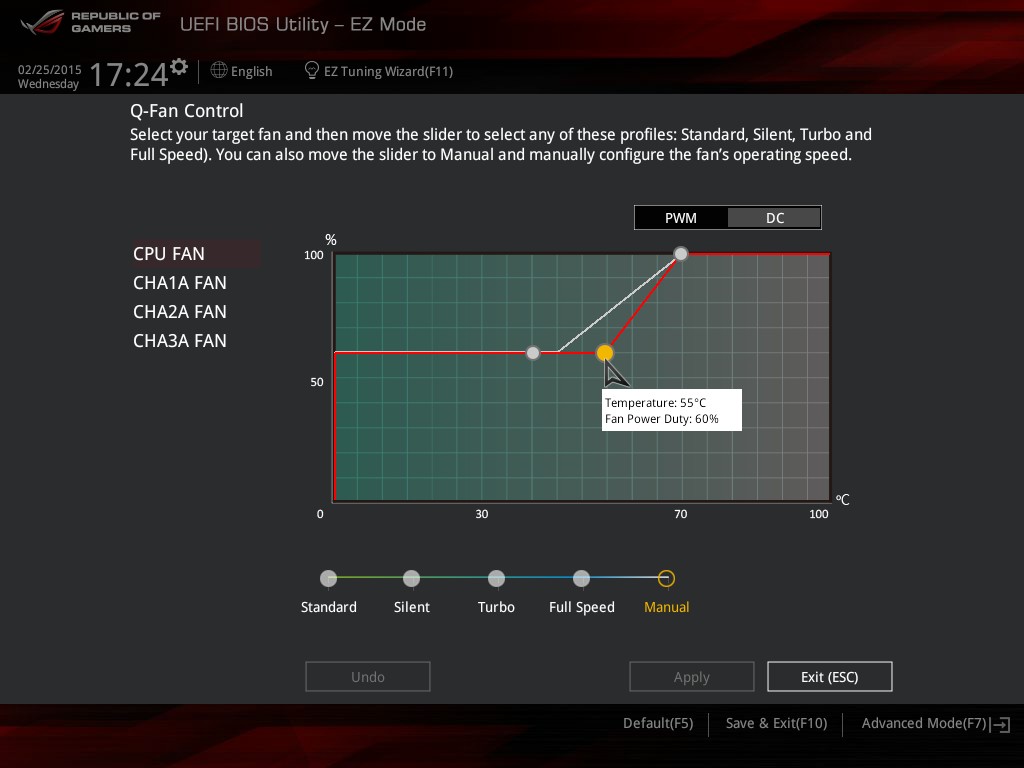
Selecting QFan Control shows the four different CPU fan groups, all controllable by PWM or DC, and here I have selected the manual fan option which allows the gradient adjustment.
One of my gripes about fan controls over the past two years is that the output of the fan can be given in two ways – either by RPM (or % of max RPM) or by voltage input. What annoys me is when motherboard manufacturers confuse the two, because voltage input is not proportional to RPM and most fans have a dead-zone or a non-linear curve. As a result, 50% power might be 30% RPM or 60% RPM, depending on how the fan is made. This can be confusing to a non-expert, and the only way to ensure you have it right is to appropriately label the axes on the graph but also to perform fan testing. ASUS does provide a fan testing tool, but this graph only shows ‘%’ as the axis and says ‘fan’s operating speed’ at the top, which makes no mention of RPM, % of RPM or applied fan voltage. /end gripe
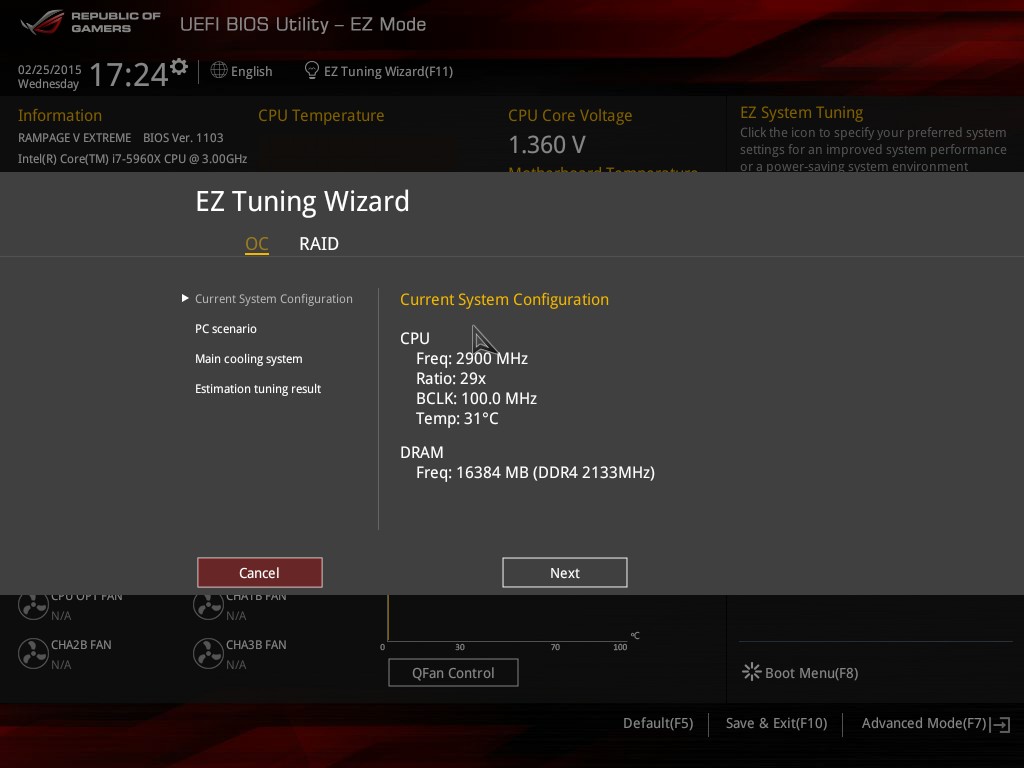
For easier overclocking, ASUS did introduce the EZ Tuning Wizard last year to help people overclock their system. In OC mode, it asks the user to choose from a list of system uses (Office, Gaming) and then the type of CPU cooler being used (box cooler, tower cooler, water cooler, unknown). Using this information and what the BIOS already knows in the system, it will suggest and implement an appropriate overclock that should factor 95%+ of production processors and DRAM. In the lucky event when you might not have a good processor, the system is designed to automatically recover from a failed boot.

Here it suggested a 23% CPU increase, and no improvement on the DRAM. Users can either cancel, go back and adjust the options, or implement the overclock with a reboot by clicking Next.
For experienced users, the Advanced mode is the place to go to have better granularity for overclocking and chipset options. By virtue of the ROG line and the fact that this is the X99 Rampage V Extreme, there will be a few more overclocking options compared to regular channel motherboards.
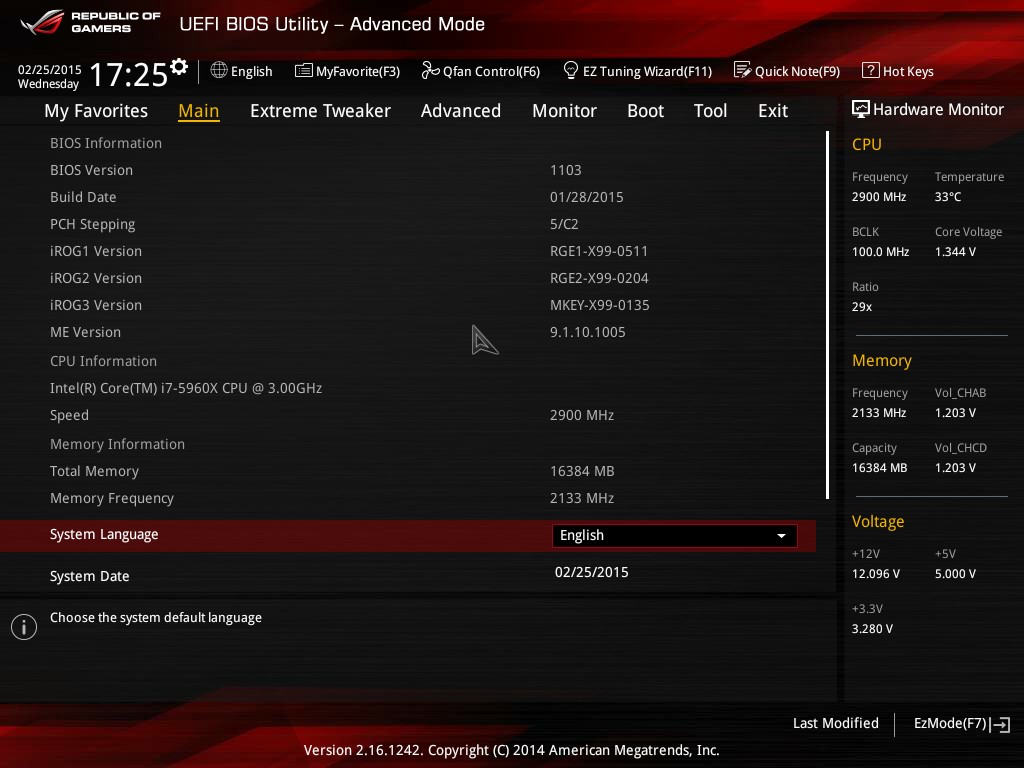
At the top of the Advanced Mode is a more stereotypical front page for a motherboard, giving lists of numbers associated with firmware versions and basic system information.

Extreme Tweaker holds the overclocking options, implemented somewhat as a long list with several sub-menu options. At the top we have the ‘target’ numbers showing the user what speed the system will be if the options are saved. Personally I think this info needs to move into the Hardware Monitor section on the right, so it stays persistent when the user scrolls through the options.
Also at the top is a sub-menu for overclocking presets, which in our BIOS offered the following:

Because the Rampage V Extreme is for gamers, overclockers and extreme overclockers (those who use liquid nitrogen to get frequency and performance records), there are options for all. In this case a gamer can implement the OC Profiles for either a 6-core (5820K) or 8-core (5930K, 5960X) CPUs, whereas extreme overclockers might want the DRAM OC profiles.
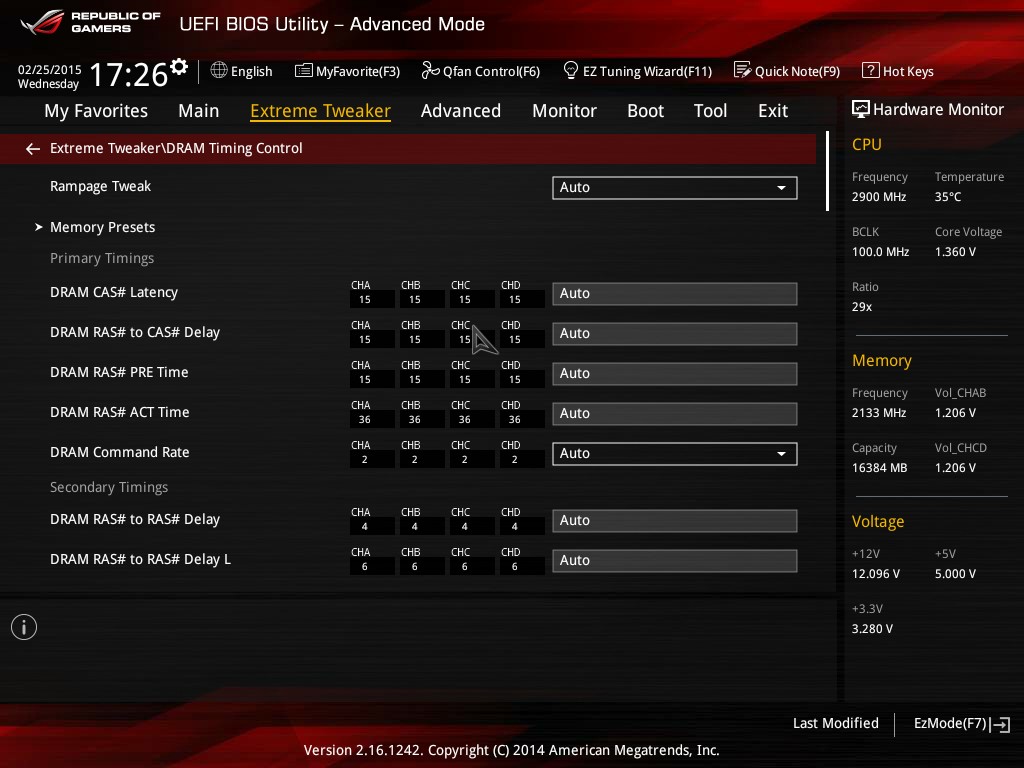
The ROG teams who work on the X99 Extreme are very proud of their DRAM knowledge, and so one of the focal points for this board is the memory section which derives from the board design to firmware capability. Here we have our regular list of sub-timings, along with an indication of the per-channel numbers. The Memory Presets menu gives an interesting list:

ASUS has gone through most of the high end memory kits and provided overclocking sub-timing packages for them. Some extreme overclockers find this useful, and so it is included. Also it is worth noting that at the top we have an IC Analyzer option, which states the following:
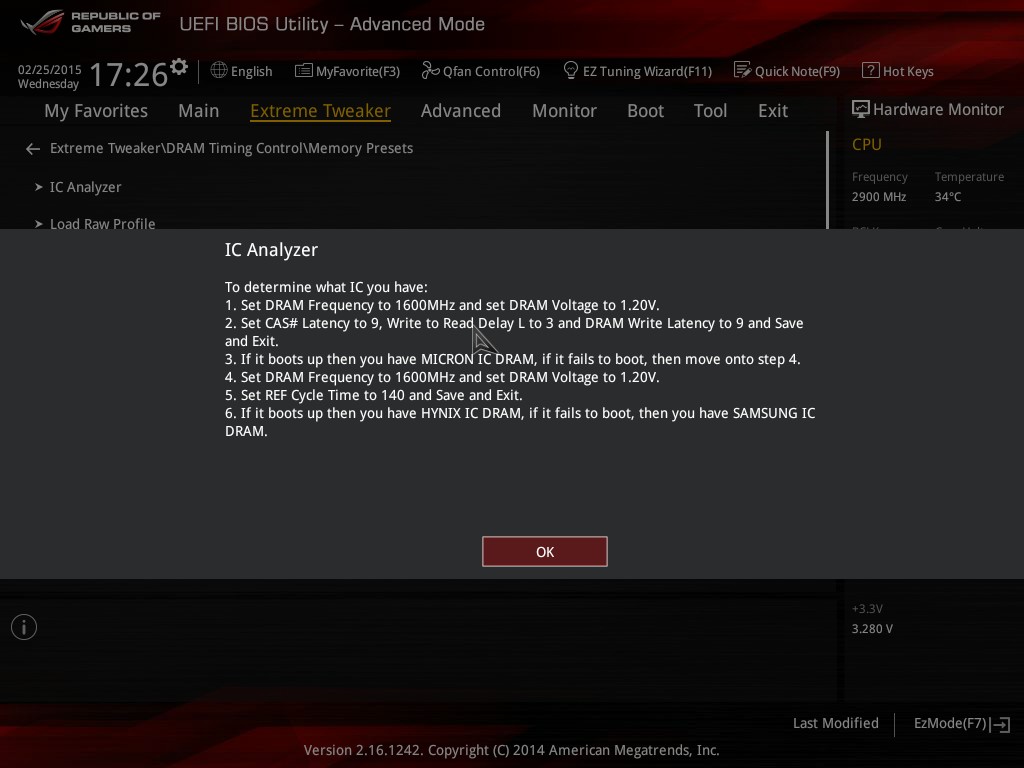
It gives a set of instructions so the user can find out if they have Micron, Hynix or Samsung integrated circuits on their DRAM. Unfortunately DRAM vendors like to hide/obfuscate the memory they are using due to the way the market is highly competitive, and different ICs can overclock at different rates, so having a way to determine which is which can be very helpful if you know what you are doing.

At the bottom of the DRAM tuning sub-menu are a series of options relating to memory training when the machine is first turned on. X99 as a platform has stricter requirements for DRAM than previous platforms, and various parameters need to be optimized during post. These can technically be disabled here in order to improve POST times but it is not recommended as the user may end up with a less stable system as a result. Many of these optimizations are due to how silicon behaves as a function of temperature and age, and by doing them it enables the system to read and write knowing that there’s less chance of an error by aligning correctly.
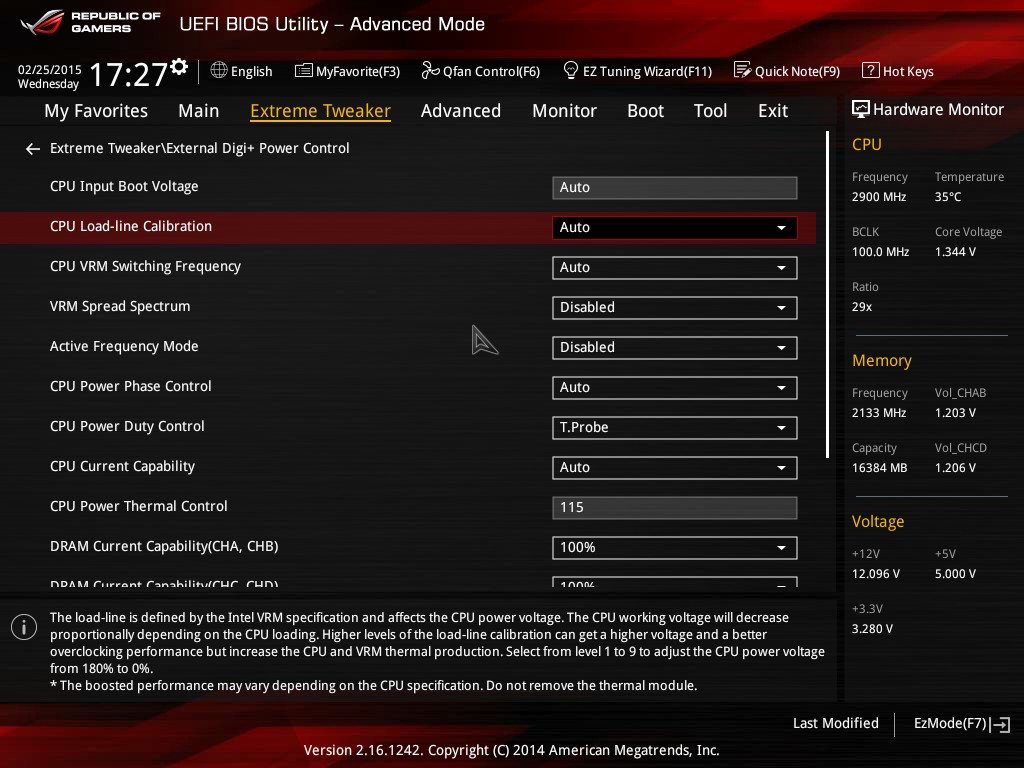
A feature on most of ASUS’ models over last few years has been related to digital power, and the control therein. This allows the user, who is typically an overclocker, to adjust how the processor reacts to voltage drop as a result of load, or switching frequencies when load is applied. The power phases for the system can also be pushed beyond regular limitations, as well as thermal control. Normally for simple overclocking we adjust the load line calibration to ensure consistent voltage application when overclocked. This typically comes at the expense of power consumption and temperature, but improves stability.
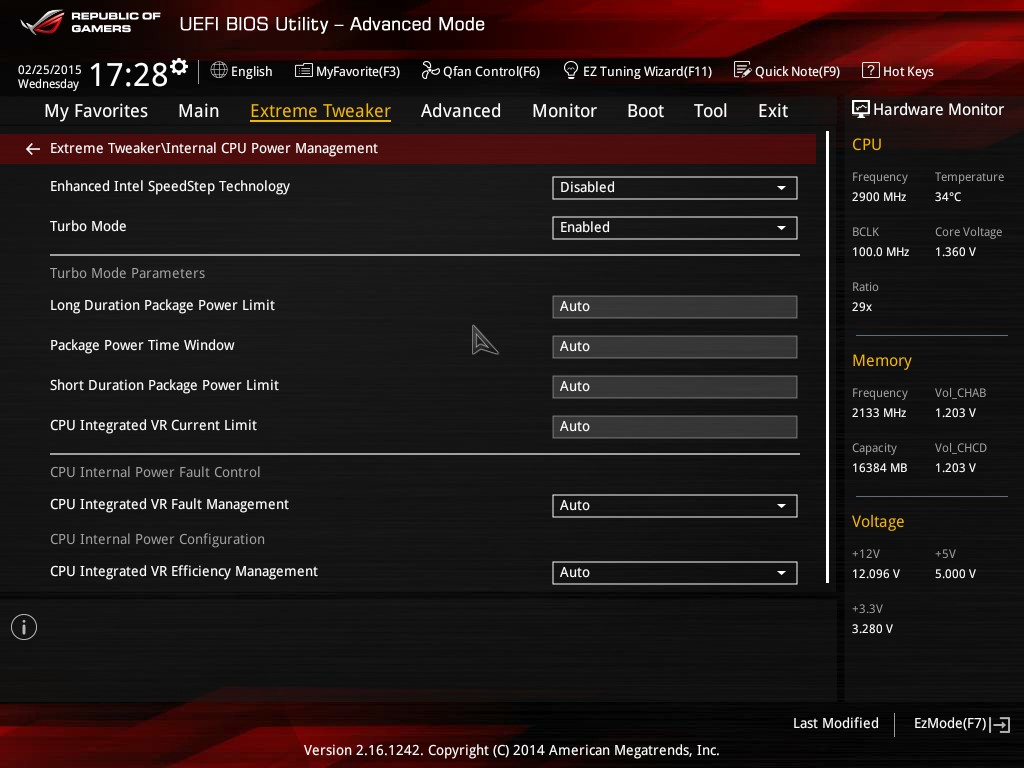
Overclockers can also adjust the turbo mode parameters, in particular the CPU response to high power drain loads and whether to keep turbo mode active in such scenarios.
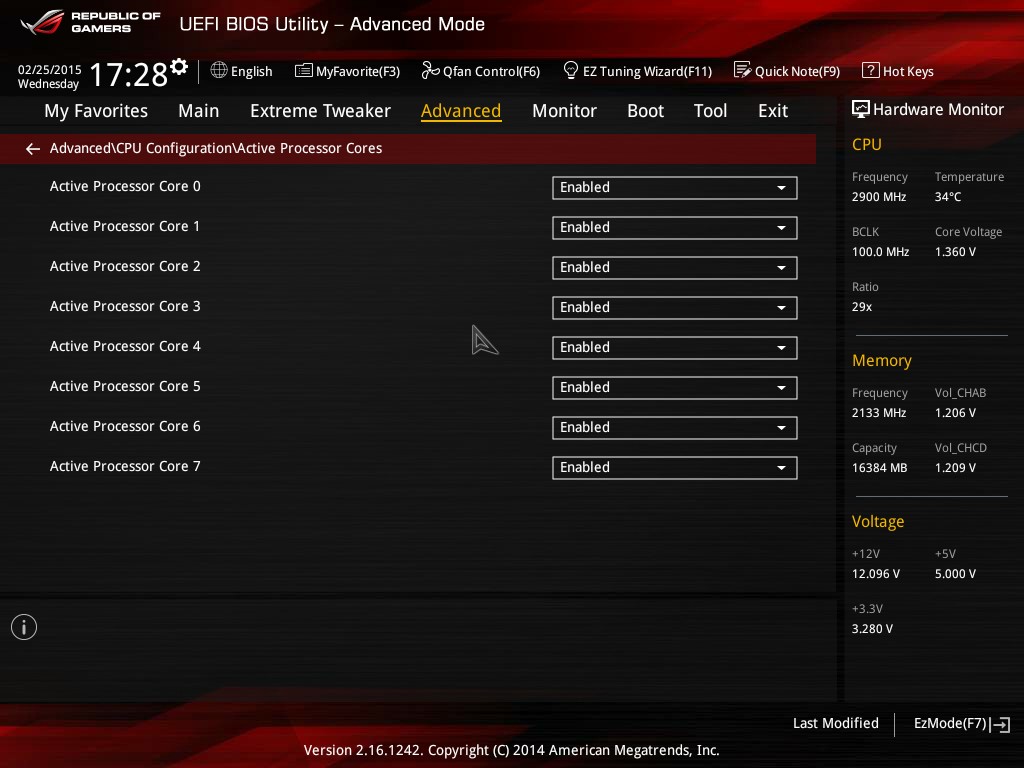
One feature ASUS likes to promote, particularly for overclockers that only require a few cores, is that ASUS can enable/disable each of the cores on the CPU individually. This allows the user to select the best 1/2/3/4 cores on the silicon die to get the best frequencies.

One feature I enjoy is being able to see what is installed where and at what speed. We have some of that with the DRAM in EZ mode, but ASUS does not implement something like Board Explorer which we see on ASRock and MSI products. Instead we get a feature like this shown above, where it shows the PCIe slots, which ones are installed and at what speed. Users can adjust the linked speed of each slot as well. Normally a user might adjust this due to compatibility with some PCIe cards, or if an internal failure caused the CPU to no longer support high PCIe speed.
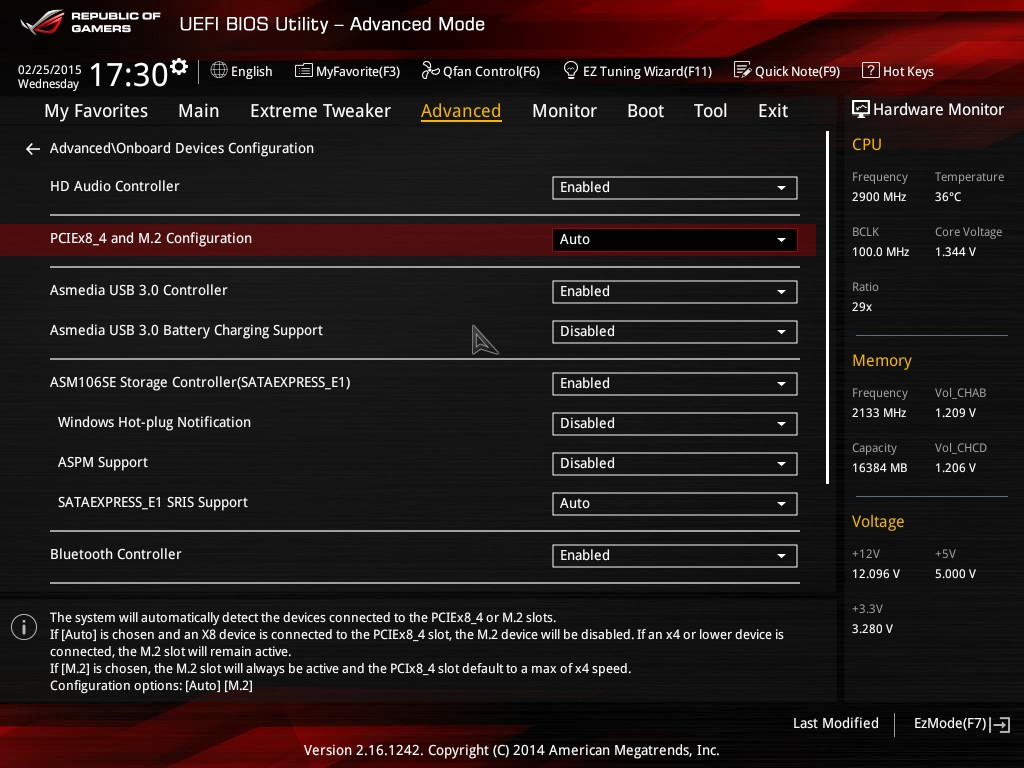
In the previous page we noted that the PCIe configuration, particularly when multiple GPUs, the M.2 slot or the black PCIe 2.0 x4 are in use. The Onboard Devices Configuration menu is where the user can enable and disable various features in order to make sure they have the right stuff enabled and where the bandwidth goes. In the last page I mentioned that despite motherboards being advertised with X, Y and Z, sometimes not all of them can be enabled at once – this onboard devices menu is where the fate of your features is decided. It is worth noting that ASMedia’s battery charging support for the two rear IO USB 3.0 ports was disabled by default in our BIOS. Users will need to re-enable it to get access to this feature.
The Monitor menu gives a long list of all the temperature sensors, fan speeds and voltages detectable on the motherboard, including the data from the three optional thermal sensors if a user implements thermistors on the appropriate headers. We also get the basic implementation of the fan controls, similar to the old style we used to see:
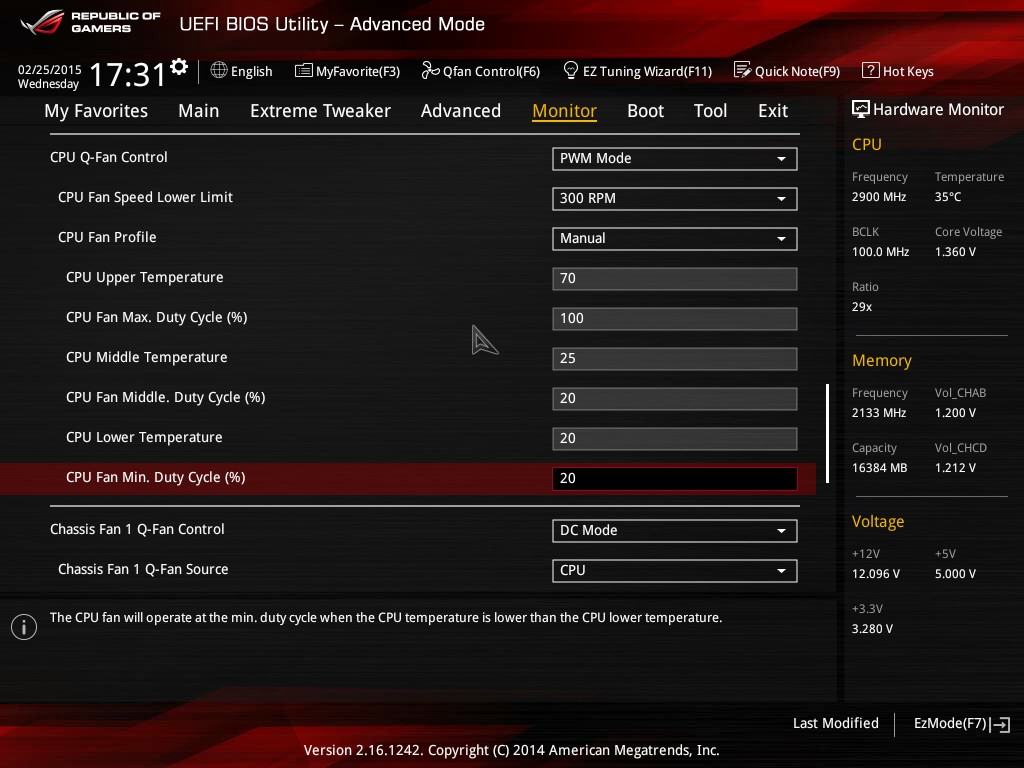
Users can select which mode the fan group is in, a minimum speed, a preset profile or a manual adjustment based on a two point gradient.
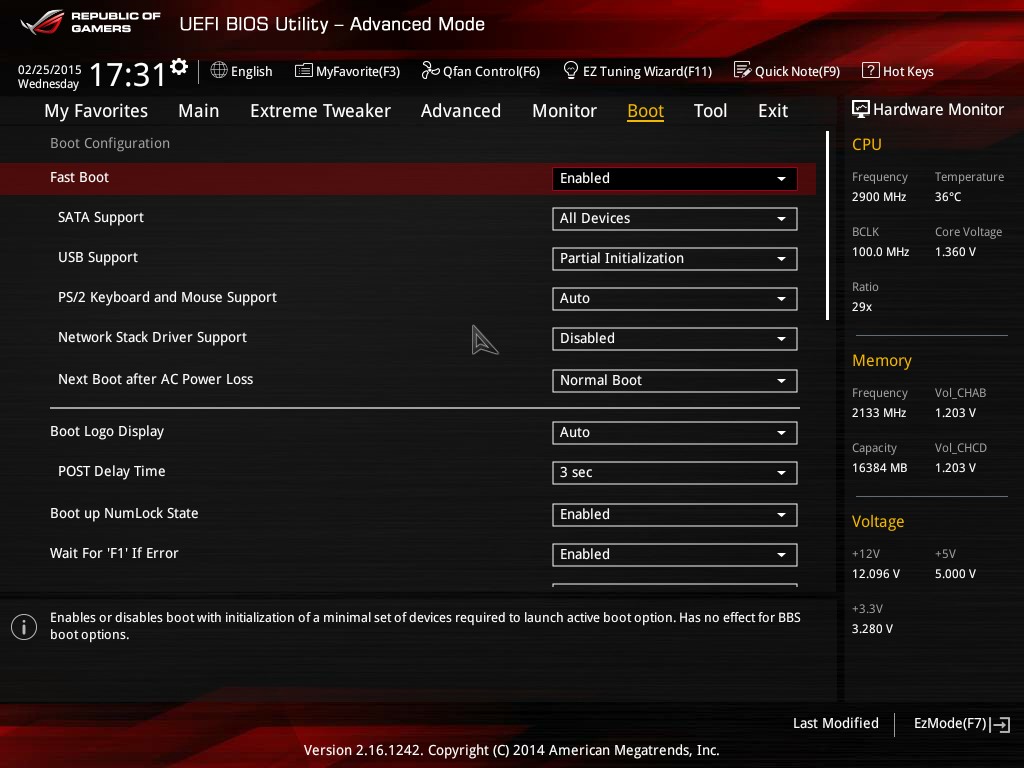
The Boot tab gives options for fast booting modes, adjustment of the boot logo, what do to in the event of a booting error and boot override that allows for a one-time boot from a different storage device.
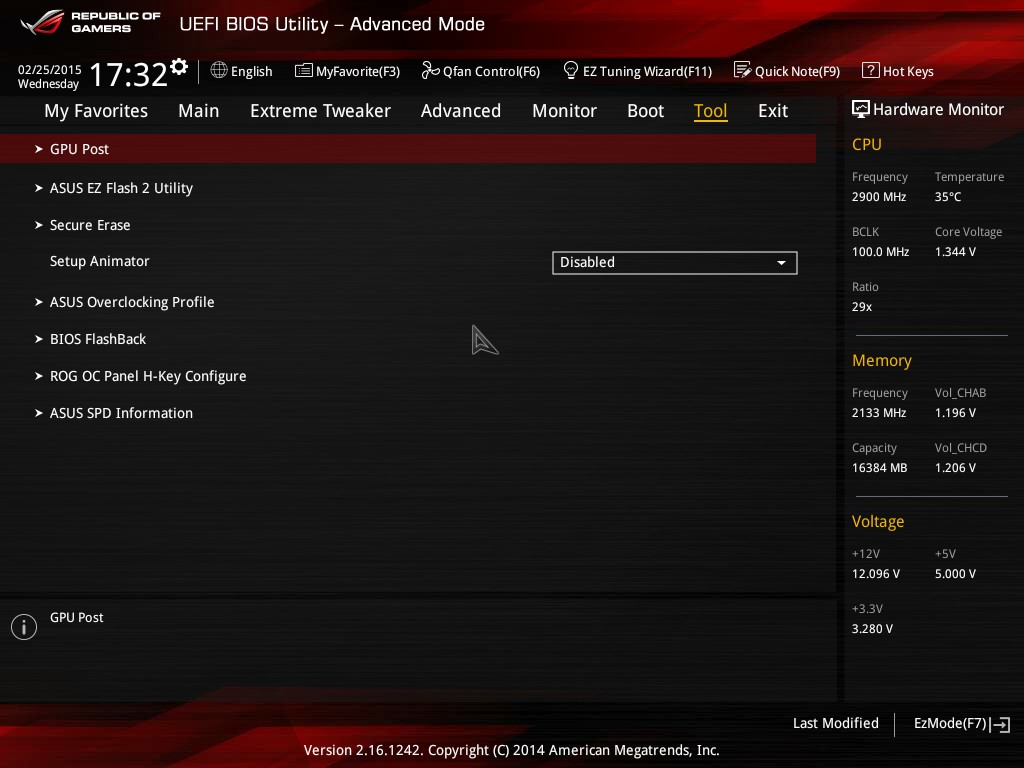
A lot of the ROG specific features can be found in the Tool menu. We’ve covered a lot of these before, but a brief rundown:
GPU Post: More detailed information about PCIe devices
EZ Flash 2: Update the BIOS
Secure Erase: Perform a complete wipe-to-zero for an SSD, restoring performance but losing data
OC Profile: Save sets overclocking settings for use in different scenarios
BIOS Flashback: Restore/update from the other BIOS
OC Panel H-Key: Implement a set of overclock options at push of a button
SPD Information: Detail about the DRAM installed
One last feature to mention is My Favorites:
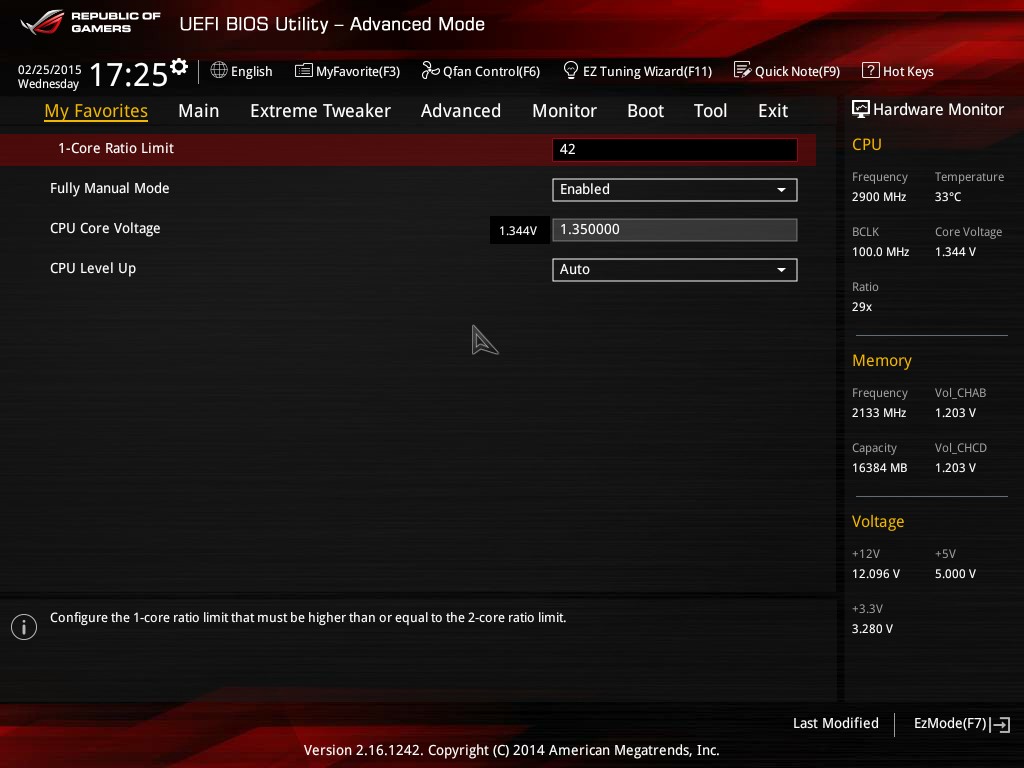
Overclockers can indicate a series of options they like and get them copied into a custom menu, making it easier to scroll through the options that matter to their overclock. For example, these are the options we usually adjust for manual 24/7 overclocking. The only downside here is that there is not an option to boot straight into the My Favorites menu – instead the user needs to navigate each time.


41 Comments
View All Comments
Malahmen - Friday, January 27, 2017 - link
I would like to warn you on this one.You can't even run a single GPU + a m.2 on that board with a 5820k because it has 28 lanes.
The board disables the 4th PCIe slot, which is shared with the m.2 slot, so no m.2 slot as soon as the bios takes over.
bottom line, you might boot from a pen drive, start to install your SO on the ssd, but after restarting, the bios wont detect the ssd (so you wont be able to select it as boot drive) because detecting your cpu, the board will shut the 4th PCIe (and your m.2 slot).
You might be able to do that with a 5930k though.