Recovering Data from a Failed Synology NAS
by Ganesh T S on August 22, 2014 6:00 AM ESTData Recovery - Evaluating Software & Hardware Options
Given the failure symptoms (and the low probability of all the four hard drives in the DS414j failing at the same time), I was cautiously optimistic of recovering the data from the drives. One option would have been to put the four drives in another DS414j (or another 4-bay Synology NAS unit) and hoping disk migration would work. However, with no access to such a unit, this option was quickly ruled out.
In many of our NAS reviews, I had seen readers ask questions about data recovery from the units using standard PCs. In the review of the LG N2A2 NAS, I had covered data recovery from a mdadm-based RAID-1 volume disk member using UFS Explorer Standard Recovery v4.9.2. Since then, I have tended to prefer open source software while keeping ease of use in mind.
Recovering RAID-1 Data using UFS Explorer Standard Recovery
Searching online for data recovery options for a failed Synology NAS didn't yield any particularly promising results for Windows users. From an open source perspective, Christophe Grenier's TestDisk appeared to be able to perform the task. However, with no full featured GUI and / or instructions for recovery in this particular case (4-disk RAID-5 volume), I fell back upon UFS Explorer for a quicker turn-around. My only worry was that I hadn't used standard RAID-5 while creating the volume, but Synology Hybrid RAID (SHR) with 1-disk fault tolerance. Though it was effectively RAID-5 with the 4x 2TB drives in the NAS, I wasn't completely sure whether the software would recognize the RAID volume.
Synology does have a FAQ entry covering this type of unfortunate event for users willing to work with Ubuntu. This involves booting Ubuntu on a PC with the drives connected, installing mdadm and using that to recognize the RAID volume created by the Synology NAS.

Data Recovery from Synology NAS Drives using Ubuntu
The pros and cons of the two data recovery software alternatives are summarized below:
-
Windows + UFS Explorer
- Pro - Intuitive and easy to use / minimal effort needed for users running Windows on the relevant PC
- Con - A licensed version of UFS Explorer costs around $200
-
Ubuntu + mdadm
- Pro - Free
- Con - Complicated for users without knowledge of Linux / users not comfortable with the command line
- Con - Synology's FAQ doesn't cover all possible scenarios
Evaluating the Hardware Options
UFS Explorer can take in disk images for RAID reconstruction. The hardware in my possession that came to mind immediately were our DAS testbed (the Asus Z97-PRO (Wi-Fi ac) in the Corsair Air 540 with two hot-swap bays configured) and the recently reviewed LaCie 2big Thunderbolt 2 / USB 3.0 12 TB DAS unit. My initial plan was to image the four drives one by one into the DAS and then load the images into UFS Explorer. I started the imaging of the first drive (using ODIN) and it indicated a run time of around 4.5 hours for the disk. After starting that process, I began to rummage through my parts closet and came upon the StarTech SATA duplicator / eSATA dock that we had reviewed back in 2011. Along with that, I also happened to get hold of a eSATA - SATA cable.
The Asus Z97-PRO (Wi-Fi ac) in our DAS testbed had two spare SATA slots (after using two for the hot swap bays and one each for the boot SSD and the Blu-ray drive). Now, it would have been possible for me bring out the two SATA ports and appropriate power cables from the other side of the Corsair Air 540 chassis to connect all the four drives simultaneously, but I had decided against it because of the difficulties arising due to the positioning of the SATA ports on the board (I would have considered had the ports been positioned vertically, but all six on the board are horizontal relative to the board surface). However, with the StarTech dock, I just had to connect the eSATA - SATA cable in one of the ports. There was no need to bring out the SATA power cables from the other side either (the dock had an external power supply).
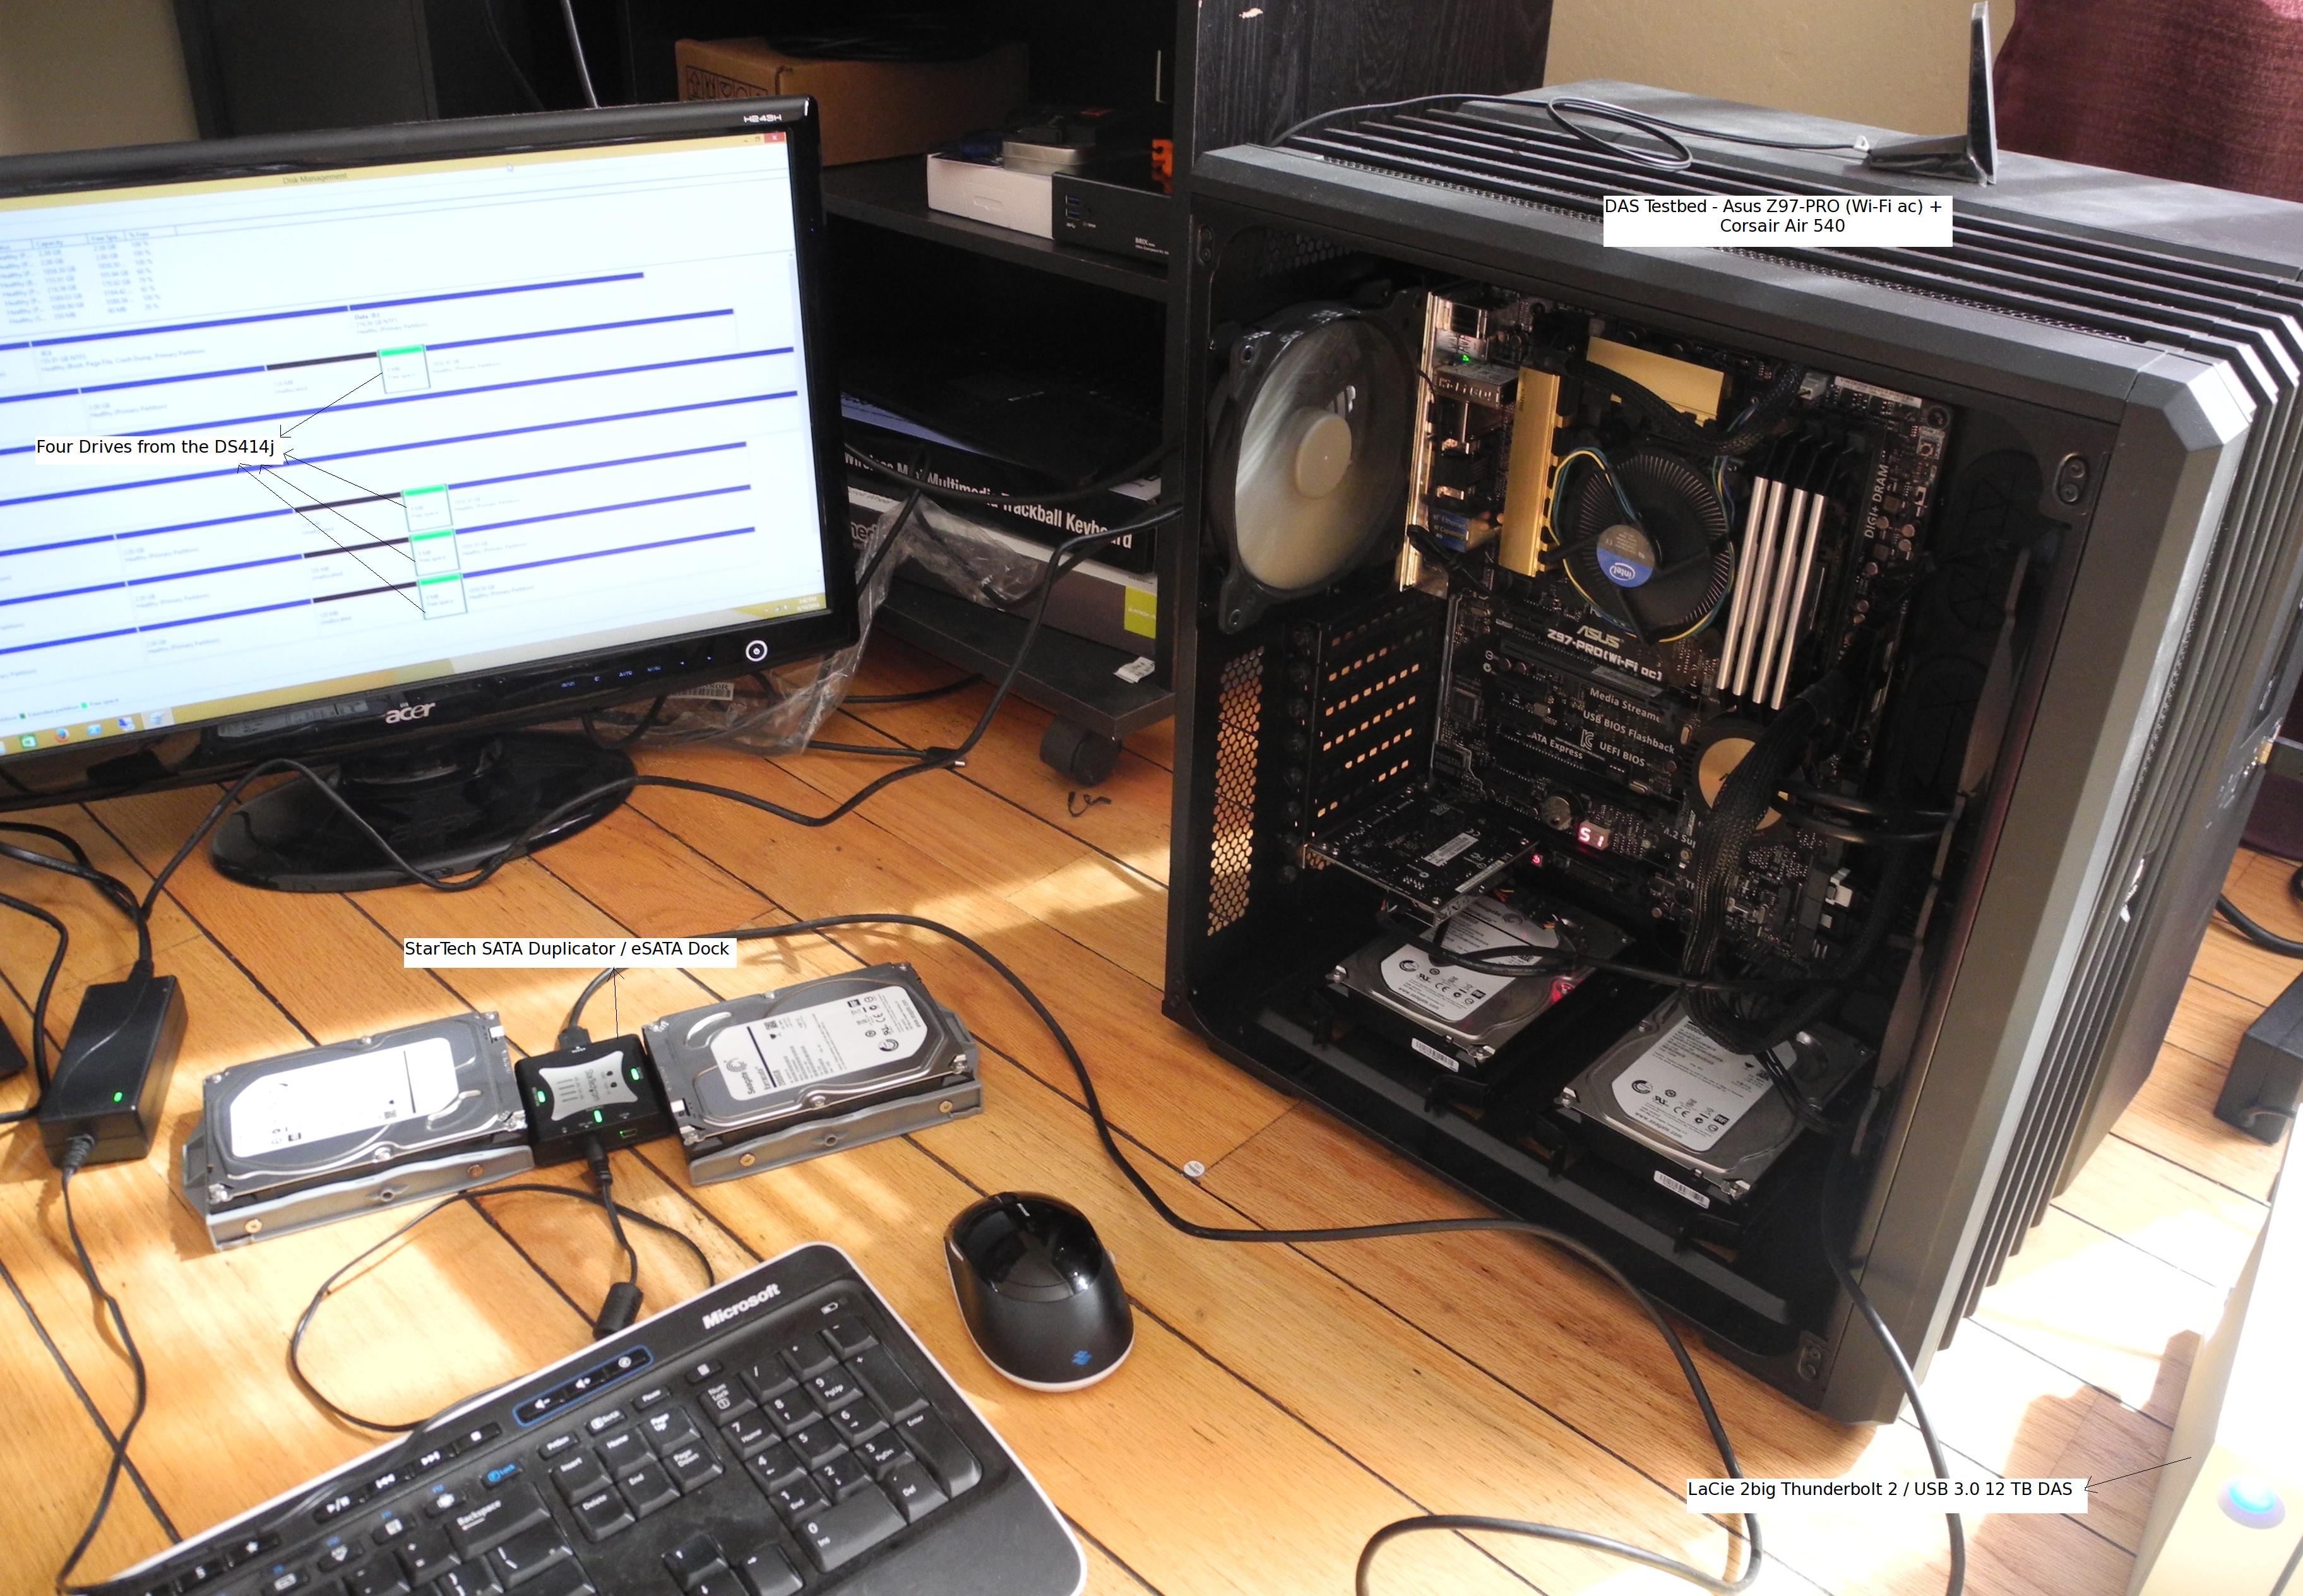
Click on image for component details
Our DAS testbed runs Windows with a 400 GB Seagate boot SSD as the only SATA drive permnanelty connected to it. I wasn't about to install Ubuntu / dual boot this machine for this unexpected scenario, but a live CD (as suggested in Synology's FAQ) with temporary mdadm installation was also not to my liking (in case I needed to reuse the setup / had to reboot in the process). Initially, I tried out a 'live CD with persistence' install on a USB drive. In the end, I decided to go with a portable installed system, which, unlike a persistent install, can be upgraded / updated without issues. I used a Corsair Voyager GT USB 3.0 128 GB thumb drive to create a 'Ubuntu-to-go' portable installation in which I installed mdadm and lvm2 manually.


55 Comments
View All Comments
omgyeti - Friday, August 22, 2014 - link
Awesome article. I've had a DiskStation for over 3 years without any hiccups, but it's always nice to see an article with multiple recovery solutions presented in the event my luck takes a turn for the worse someday. I also back the NAS up to a USB drive, but don't want that to be my only hope in the event something ever happens.garrytaylo987 - Wednesday, June 6, 2018 - link
Issue related hard-disk are common so don't worry if you need a instant recovery of the data and partition, first try any free tool like mini tool that is secure,user-friendly and free. If the issue is not solved.t-rexky - Friday, August 22, 2014 - link
A very interesting read - thank you.I have DS1512+ with four 1 TB drives set-up using Synology Hybrid RAID and the fifth 3 TB drive holds a backup of the data. Coincidentally, I have been concerned about the backup integrity and I just had some discussions with Synology on the subject. The Synology Backup application cannot create a complete backup of my data because it skips all the symbolic links present in my data on the RAID volume. The only workaround at this point is to set up a cron job to use rsync for backup purposes as opposed to the Synology GUI backup application. Synology have promised to look into correcting this in the future, but right now the backups created by the DSM GUI are not complete.
Dahak - Friday, August 22, 2014 - link
Interesting article and a nice look at some possible ways to try to recover data.But I think that you got lucky as it was a hardware failure and not a drive failure, especially when you mentioned that the UFS Explorer automatically found the array.
Wonder if other people, as I am curious, may want to see how this would play out with a simulated drive failure, ie leave one of the drives off to simulate a failed / clicking drive.
DanNeely - Friday, August 22, 2014 - link
Ganesh already does do raid rebuild tests that simulate this.Dahak - Friday, August 22, 2014 - link
I do know that he does the raid rebuilds, but more a worse case scenario where the raid rebuild does not work due to some hardware issue and have to pull the drive and put them into another system.Although I know ideal that where your backups come in.
Flunk - Friday, August 22, 2014 - link
Compared to my experiences with low-end NAS units from other vendors this actually seems quite reasonable. It's the sort of thing that most enthusiasts or IT people could do without having to send it out for data recovery.icrf - Friday, August 22, 2014 - link
I set up a DS411j a few years ago with 2 TB Seagate drives in RAID 5 that's still working perfectly fine. I was explicit about RAID 5 because I had manually run arrays in mdadm for a while and noticed that's all it was when I logged into a shell on the NAS. I never had any doubt that if the NAS itself failed, but not the drives, that I could just plug them into another machine and have access to everything. It would never have crossed my mind to look for a Windows tool to access them. Having to stop an array that wasn't quite there before forcing it to show up probably would have taken me awhile to figure out, too.The worst that happened to me is when I had drives split between multiple SATA controller cards, and one of the controller cards flaked out and dropped half the drives in my RAID 5 array all at once. Since the array wasn't just degraded, it was down, there were no changes made. I just had to convince madam they weren't half spares. Calling madam --assume-clean was the ticket. You just have to get the order of the drives right when you pass in the devices else the file system is corrupt. You can stop and restart the array with another --assume-clean and another guess at order until the file system is valid without problem.
I love madam. Unfortunately, I also had a drive dying slowly with lots of bad sectors silently corrupting data for months. That led me to ZFS and data checksums, which are completely awesome. I'm not nearly as familiar with ZFS as I am with mdadm, so it makes me a little nervous. It also doesn't allow online capacity expansion, like mdadm. I think my next array is going to be a little more bleeding edge and use btrfs. Should be close to the best of both worlds.
Gigaplex - Saturday, August 23, 2014 - link
I agree with your sentiments about considering btrfs, however I'd advise against it for RAID5 equivalence for quite some time. Not only is it still considered experimental, it flat out isn't finished. Last I checked, it wasn't capable of automatically dropping a drive as it goes bad in parity mode.isa - Friday, August 22, 2014 - link
Great article. I think the two biggest issues were that the QSync app didn't do what you told it or expected it to do, and when it failed, the QSync app didn't tell you that it failed. hardware has come a long way in the past 15 years or so, but the robustness of backup/sync apps has not - we had apps that didn't do what we wanted many years ago.Given the vital importance of backup and sync apps to do what we expect them to do, app developers should spend much more effort with scripts or the like to set up backups more robustly, conduct self-tests of configs and settings to ensure settings will do what you expect, and better alert reporting if things occur that you don't expect. Put another way, you found out that your backup failed only when you needed it, which was exactly the SOTA 20 years ago. Disappointing (but not surprising) that it still may be for many users..