The MSI B350M Gaming Pro Review: Micro Size, Micro Price
by Gavin Bonshor on October 12, 2018 10:00 AM EST- Posted in
- Motherboards
- Gaming
- AMD
- MSI
- mATX
- AM4
- B350
- Ryzen
- B350M Gaming Pro
BIOS
Every AM4 motherboard that MSI has released so far uses the Click BIOS 5 UEFI BIOS. The general design consists of a red and black contrasting theme with a white text and resembles the typical ‘gaming theme’ across its entirety. The Click BIOS 5 GUI is very well laid out with an easy to navigate entry splash screen, and a neatly laid out advanced BIOS screen which can be switched to by pressing the F7 key. The BIOS is also generally responsive, although it did stutter a little when collecting the screenshots for the gallery.

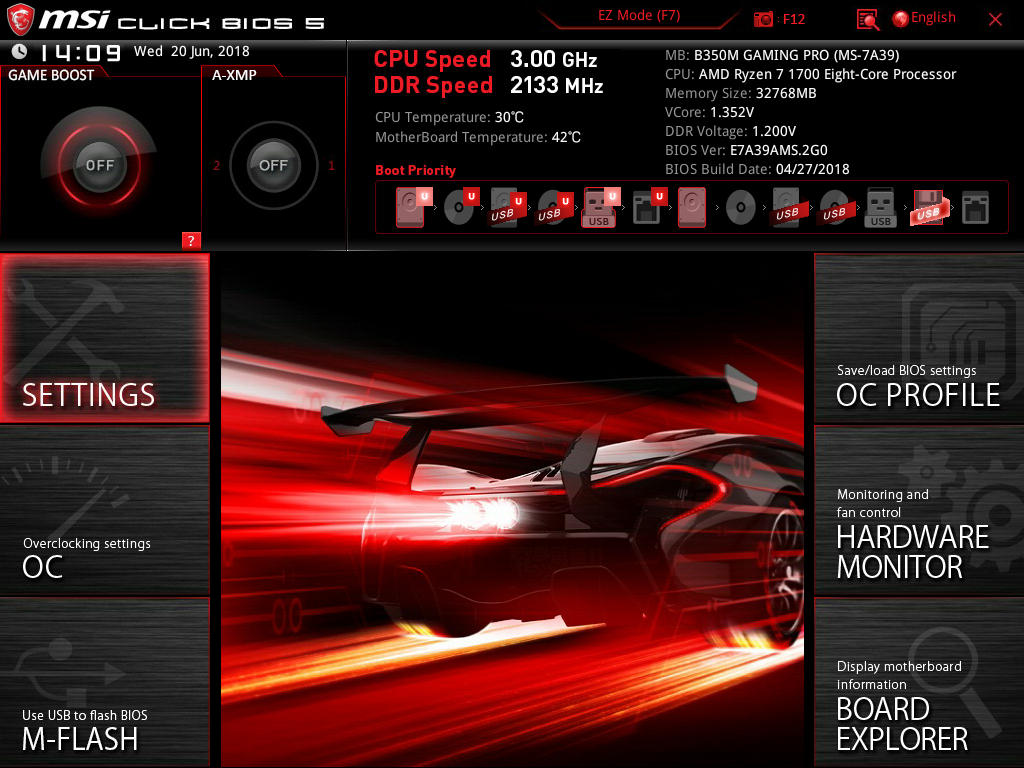
The basic splash screen after entering the BIOS has plenty to offer including information pertaining the installed processor and current set voltages on the right-hand side of the center screen. To the left is a list of options allowing users to navigate between CPU, memory, storage and fan information screens. At the top of the screen users can enable MSIs Game Boost which dependent on the model of Ryzen processor installed, will apply a CPU core frequency bump as well as additional voltage to support this. For reference with Game Boost enabled, our Ryzen 1700 would apply a 400 MHz increase, disable AMDs Cool’n’Quiet feature, ramp up the CPU fan speed and a completely unnecessary 1.45 V.
At the bottom, there are options to enable or disable the HD Audio controller, switch between AHCI and RAID mode and also menus to enter the M-Flash BIOS flasher mode, as well as the hardware monitor. There is also a button next to the Game Boost switch for enabling XMP 2.0 memory profiles. Just to the right of this along the top is the ability to change the Boot Priority of installed storage drives and even when flicking between the basic and advanced modes, the panel along the top remains the same throughout the BIOS.
After pressing the F7 key, it opens up the advanced BIOS mode with menus ranging from settings, overclocking setting, the M-Flash flashing utility, OC profile banking area, hardware monitor and the board explorer.
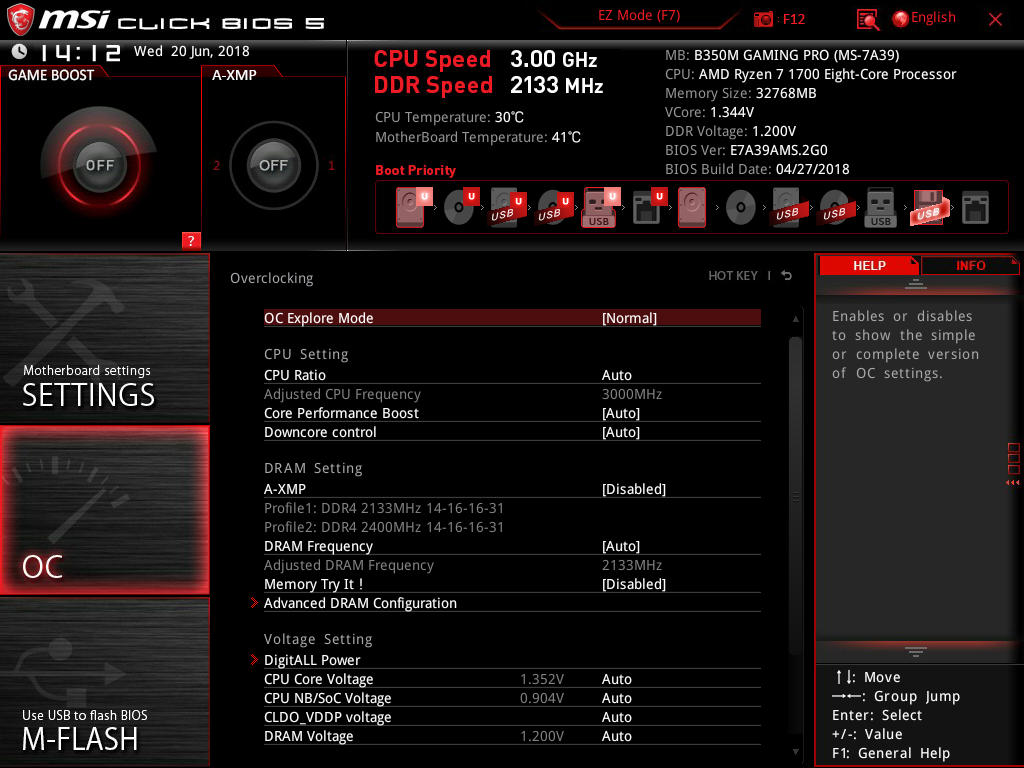
The first port of call when installing a new system is generally the overclocking settings and as we have seen with the X370 XPOWER Gaming Titanium and B350 Tomahawk, the options available don’t differ much. All the general CPU frequency overclocking related options such as CPU ratio and CPU Core voltage are present along with options to enable the XMP 2.0 profile on installed and supported memory; this also includes plenty of options to manually tweak the memory latency timings in the advanced DRAM Configuration menu and also the ability to set your own memory strap as well as the DRAM voltage.

Whereas other manufacturers have a dedicated fan tuning utility build in within the BIOS, MSI has combined this function with their hardware monitor. Within the menu brings up the ability to enable Smart Fan Mode with either PWM, DC or auto fans, with the option to ramp up all the fans to full speed with a click of a button. Along the bottom is a handy bar which displays different voltages ranging from CPU Core, to DRAM, even to the voltages being rallied along through the system 12, 5 and 3.3 V rails. There is also the ability to set a custom fan curve dependent on current temperature in relation to fan percentages, with full speed being 100% and half speed being 50% etc.
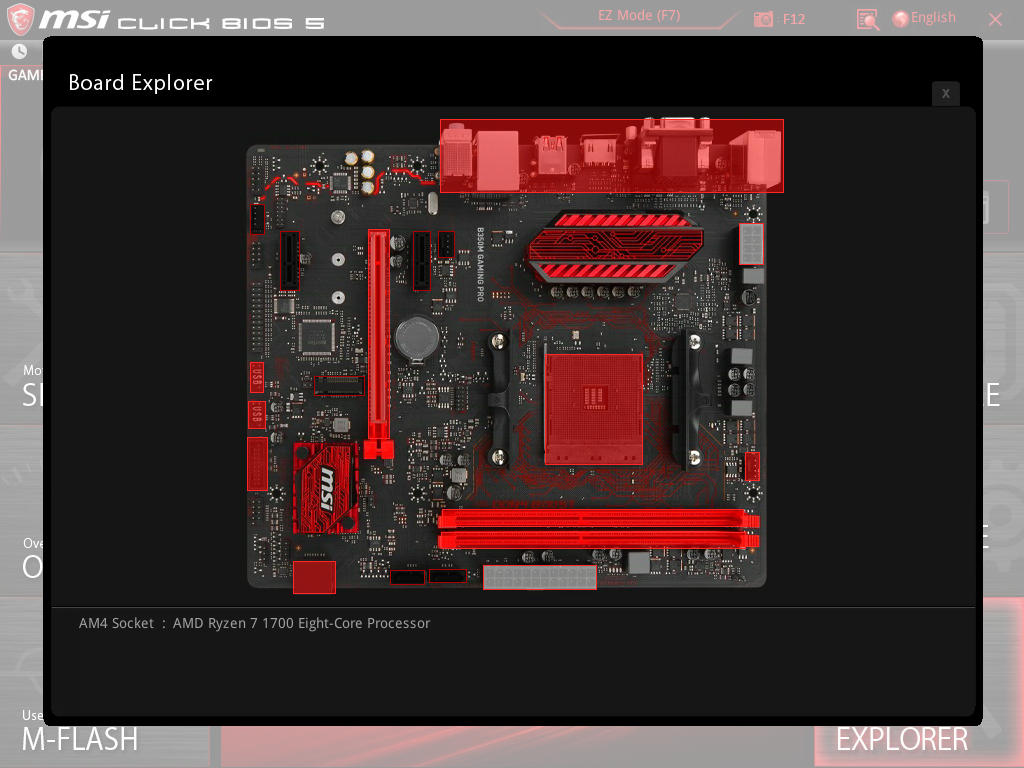
The Board Explorer has a static image of the B350M Gaming Pro, with key areas shaded in red to provide information on installed components. This also includes USB devices plugged into the rear panel with the board explorer even being able to detect the CM Storm QuickFire Rapid-i keyboard used on the test bench.
MSI tend to do a good job with their UEFI BIOS and as seen throughout our MSI AM4 socketed motherboard reviews, they keep things fairly consistent throughout their range, which is a good thing for familiarity reasons. Even without this, Click BIOS 5 is easy to navigate around and is responsive throughout with all the options you would expect from an AM4 motherboard, surpassing what I would expect from a board at its current price point.
_thumb.jpg)
_thumb.jpg)
_thumb.jpg)
_thumb.jpg)
_thumb.jpg)
_thumb.jpg)
Software
While MSI are well known for offering customers with copious amounts of software and utilities, but what is on offer to owners of the B350M Gaming Pro has been reduced compared to the Tomahawk etc. The included software includes the MSI Command Center utility, the MSI Gaming app, MSI Gaming LAN Manager and the MSI Live Update 6 tool. There is also an MSI Gaming themed CPU-Z available, although it’s advisable to download the latest version directly from the product page.
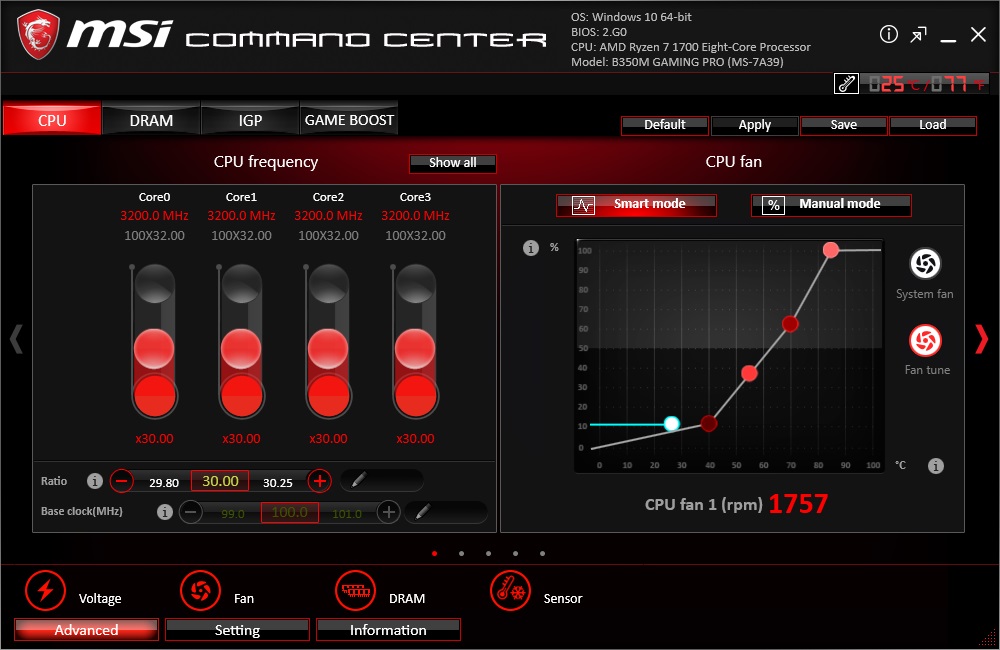
The MSI Command Center gives users a wide host of information regarding CPU, memory and even integrated graphics, with options for overclocking the processor through the ratio. The ability to overclock through the Base Clock has been disabled as none of B350 / X370 motherboards that MSI produces features an external clock generator. Even MSIs X470 range is thin with only the flagship X470 M7 AC model being reported to feature an external clock generator.
The options available for overclocking include CPU multiplier tweaking, the ability to change the CPU Core voltage with a limitation of 1.4 V maximum, SoC voltage with a maximum of 1.3 V being allowed and DRAM voltage which is a maximum of 1.5 V. There is the option to tweak memory slightly with limited options allowed for changing DRAM latency timings. I still recommend all overclocking is done through the BIOS for maximum stability and peace of mind.
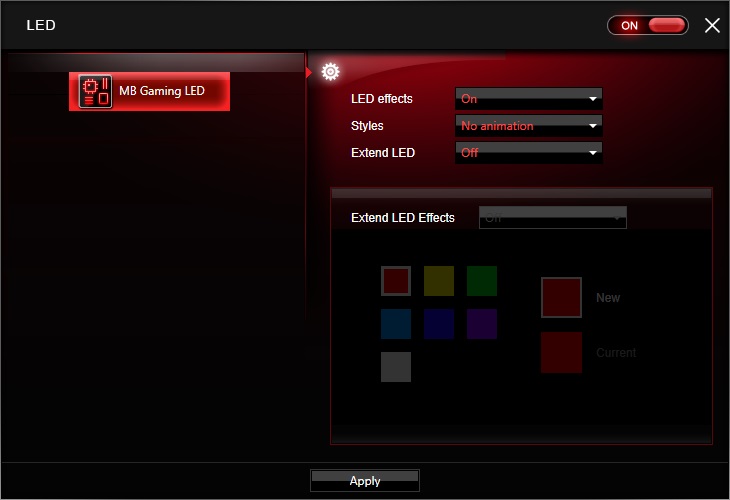
While the MSI Gaming App does offer different modes designed to enhance the performance of the processor, when enabling the different modes consisting of OC Mode, Gaming mode and Silent, there wasn’t any fluctuation in CPU Frequency or CPU Voltage when monitoring within CPU-Z. The most useful function of the Gaming App is the LED customization options. If there B350M Gaming Pro had RGB enabled LEDs, this would be the place to make the board glow like a rainbow. Due to the price and cost-cutting measures MSI has gone with for this model, the LED choice is locked down to red.
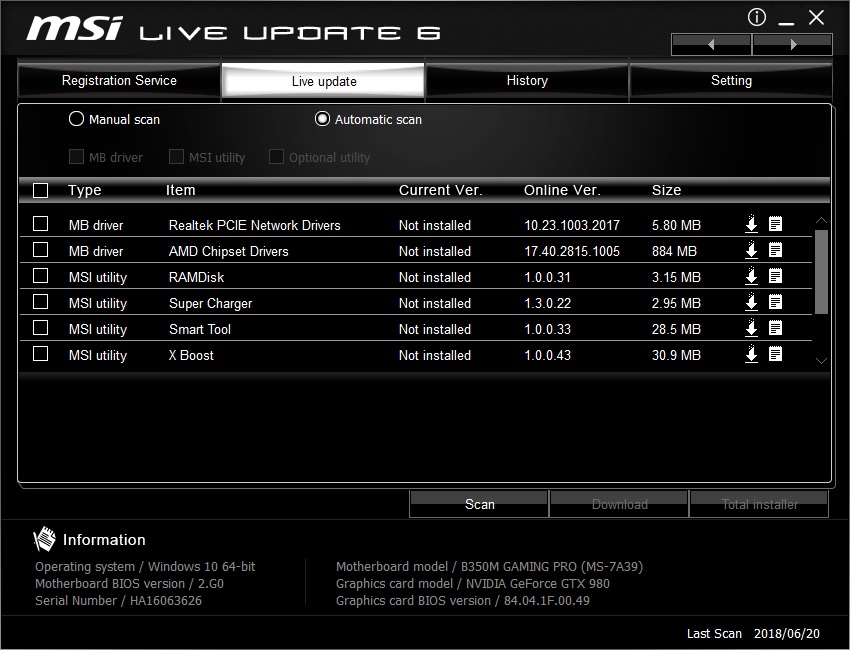
MSI Live Update 6 is a handy application which allows users to update and download things like chipset drivers and MSI applications to enhance the overall user experience. The application scans the latest version direct from the MSI servers and can install every available piece of software for the B350M Gaming Pro by simply clicking the check box next to type and selecting total installer in the bottom right corner. The information panel at the bottom of the panel has vital information on vital things such as the currently installed operating system, the firmware version installed onto the BIOS chip and even the motherboards serial number.
One thing to note about the software available for the B350M Gaming Pro - there is a lack if software to control the audio. Usually, with Realtek based audio codecs, at least some form of software is available for download, but it wasn't included in this board.


18 Comments
View All Comments
Lazlo Panaflex - Friday, October 12, 2018 - link
LOLHey Gavin, how about grabbing an MSI 450M Gaming Plus and doing a comparison?
PeachNCream - Friday, October 12, 2018 - link
Monitors live much longer useful lives than the computers connected to them.Lucky Stripes 99 - Sunday, October 14, 2018 - link
People in this price category are more likely to have older gear. As example, I'm still using DVI because that's what my KVM accepts. The newer DisplayPort version of my KVM costs $370. Until I upgrade to a 4K monitor, there isn't much point in making the switch.Eletriarnation - Monday, October 15, 2018 - link
Seems like it would be ideal if they could replace DVI-D with DVI-I and add DP to allow 4K @ 60Hz, but maybe this wasn't designed with Raven Ridge in mind.ballsystemlord - Friday, October 12, 2018 - link
I seems as though every AMD motherboard you review has 6+2 or less phases, whereas the filled in sections of your Intel Z390 MB list indicates 8+2 and often 10+2 or 12+2 or more phases. Why is this?Do AMD processors really require less power? Or are the MB manufacturers unfairly cheapening the AMD MBs on purpose?
notashill - Saturday, October 13, 2018 - link
Z390 is the high end Intel chipset, of course the boards for it are high end. These B350/B450 boards should be compared to B360 boards, and they are not so different. X370/X470 mobos are what you want to compare with Z390 and they usually have plenty of power phases. The last one reviewed on Anandtech had 16.ballsystemlord - Sunday, October 14, 2018 - link
Ah, yes. I'm just not up on which Intel chipset is which "end". Thanks!AlB80 - Saturday, October 13, 2018 - link
3 phase of fossil mosfets. Don't touch this.